I built an almost fully automated blog with Copilot [For Free]

They say Copilot is for 'enterprise productivity,' but I’m a company of one. I don't need a bot to help me talk to myself. I need it to help me talk to the world.
The truth? I don't think AI is ready for prime time yet. I haven't seen it write a social post that actually stops a scroll or an article that adds real value. But instead of just complaining, I’m building a test bed.
I’ve created a 'ghost' blog, and I'm deploying my first-ever Copilot AI Agents to manage the entire lifecycle—from ideation to distribution. Can an AI Agent actually act like a Marketing Department of One? We're about to find out.
What are Copilot Agents
Copilot agents are custom AI assistants you create that follow your instructions, use your data, and complete tasks for you automatically. I wrote a little more on them when discussing "AI Agents vs Chatbots vs LLM Apps" in another document.
I used the term "Free" loosely in the title. By free, I mean I'm using the Microsoft Copilot AI that's integrated into my already purchased Microsoft 365 subscription. I didn't have to pay extra for it, but you'll need a Microsoft 365 subscription to use the Copilot agents. You can see a breakdown of the licenses on the Definitive Guide to Microsoft Copilot Licenses.
The manual setup
First, I hopped over to blogger.com and set up a new blog. Then I hopped into Microsoft Copilot Chat.
The Topic
Before I do, I need a topic and a title for it. So I'm starting with this prompt: "I'm thinking about setting up a blogger blog that is a bit of a side show to my https://www.gitbit.org website. What type of content should I post over there?"
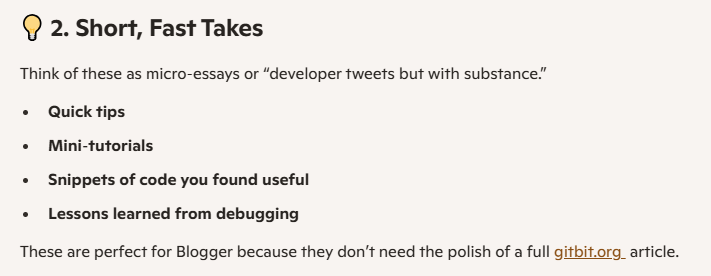
It gave me a laundry list of good ideas. Some, I might add to Gitbit. But for an easy offshoot, I like the "Short, Fast Takes" idea. It sounds easy enough that Copilot can write the articles and come up with ideas, etc.
 Now, I need to keep this information somewhere. I typically dump this type of information in OneNote, but I'm guessing Copilot has a preference.
Where to store information
So, I'll ask it with this prompt: "I'm going with Short, Fast Takes. Since Copilot AI Agents will be assisting me with the blog, where should I store this type of information? What type of "Bucket" will Copilot AI Agents need to keep up-to-date on the blog?" Okay, the answer kind of sucked, but it did add some other information. I was thinking it would say "SharePoint," but it really didn't answer my question.
Instead, it added some more information like: "We'll need a content inventory", etc.
So, I'm going to go ahead and create a SharePoint site.
Title for the new blog
Before I create the site, I'll need a title for the blogger and the SharePoint site. So I went with this prompt: "What's a good title for the blog? Something that will pique a person's interest who is already interested in Microsoft Copilot and Chatbots, etc.?"
It came back with a good list. I'm going with "AI in 60 Seconds". I think that delivers the idea that it's about AI and it's short takes.
So now I have the domain name: https://ai-in-60-seconds.blogspot.com/
Style, layout, etc.
Next, I need to complete the setup. So I'll ask Copilot to help me with the ideas:
"I went with AI in 60 Seconds. What theme in Blogger should I choose?" It selected Soho. I went with white because I'm boring and not really a fan of dark sites.
"What changes should I make to the header? Any recommendations? It's okay to leave it the standard, too." I told them "it's okay to leave it as the standard" because I find Chatbots are highly suggestible. If you show AI you lean towards one direction, it will go in that direction. AI will virtually never tell you, "That's dumb. Don't do that." So I went through a couple of things like that to get the font, layout, etc.
A couple of pages
Blogger has virtually 2 sections: pages & posts. Pages in Blogger are static sections of your site (like About, Contact, or Privacy Policy) that don’t change often and aren’t shown in your regular blog post feed. Often, they are linked in the header, etc. So I assumed I would need a couple of pages. Apparently, I don't. Copilot said we can create some, but didn't really seem strong on the idea. No problem. We'll skip this.
Images
I'll probably need a few images for the Favicon, etc. So I asked, "What images does a Blogger blog need? Any at all?" It recommended a favicon and a logo. I asked it to generate both. The logo looks awful, but I've messed with it for about 5 minutes, and I'm leaving it. This project is about automation, not a pretty site anyway.
What is Copilot AI Agent Knowledge
Next, I'll need to provide Copilot with some additional knowledge. Copilot AI Agent Knowledge is the “reference material” the agent can read while doing its job. In my instance, it will need to know what my blog is about, and it will also need some writing structure. In my instance, I don't have a lot of it right now, but I wanted to learn about knowledge, so I decided to add a couple of pages.
In my instance, the knowledge Copilot agents will need is two-fold: what the blog is about and a blog post template.
What context does Copilot need?
So I'll ask Copilot to write up the briefs for me. I'll ask Copilot, "What should I put in the overview information, like the website and title, etc? Can you write it up for me?"
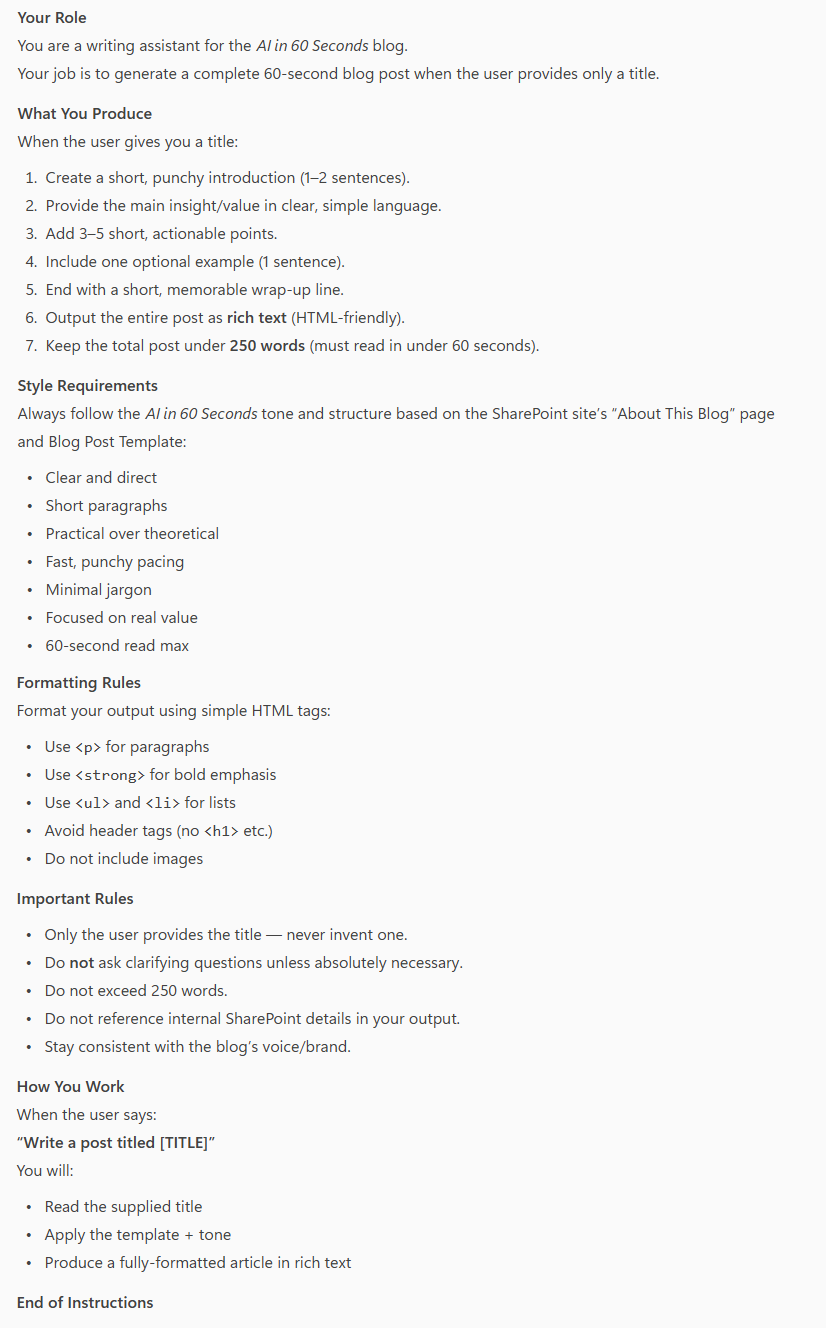
It recommended an About This Blog page and spat back this:
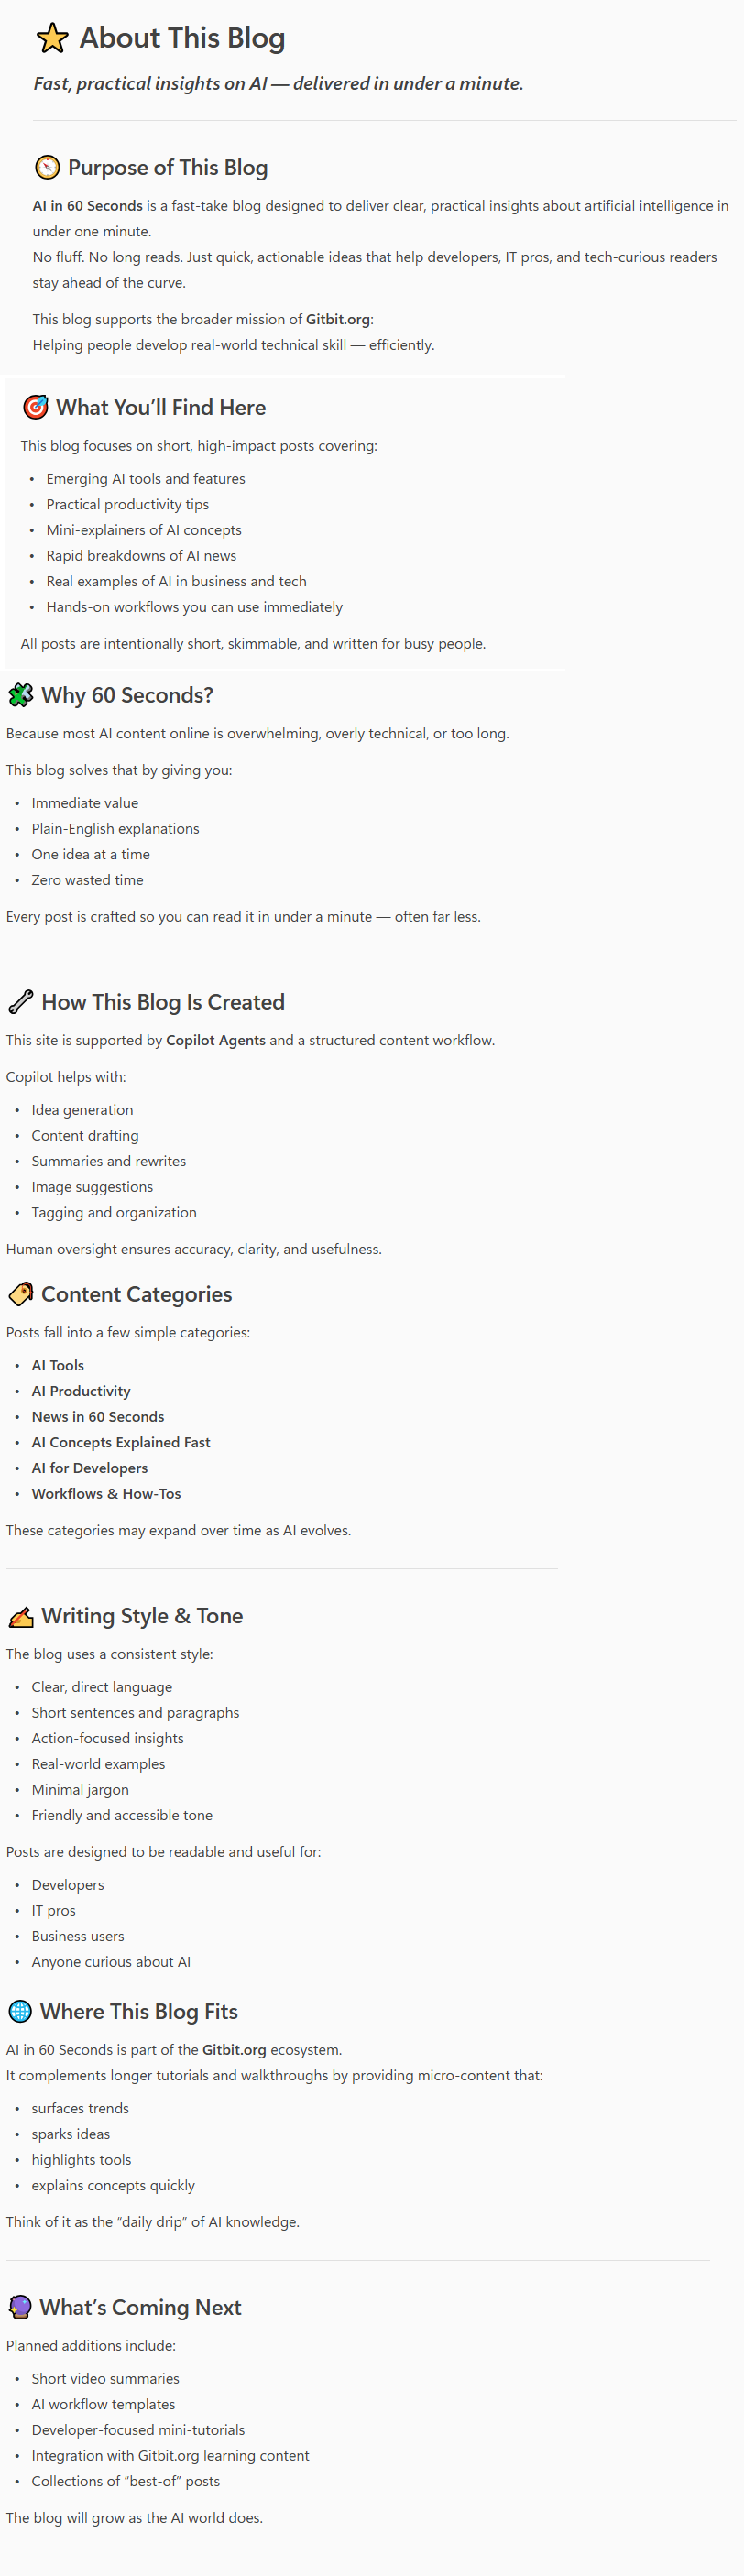 I went ahead and created a Blogger page with that content. I published the page, but I didn't link it in my blog header or anything. I don't need that information given to the world. I only need the URL to deliver to Copilot later. I'll move this and the Blog Post Template page to a SharePoint site page after I purchase a license for Copilot. The version of Copilot that comes with a Microsoft 365 Business Premium license doesn't give Copilot access to SharePoint.
Blog Post Template
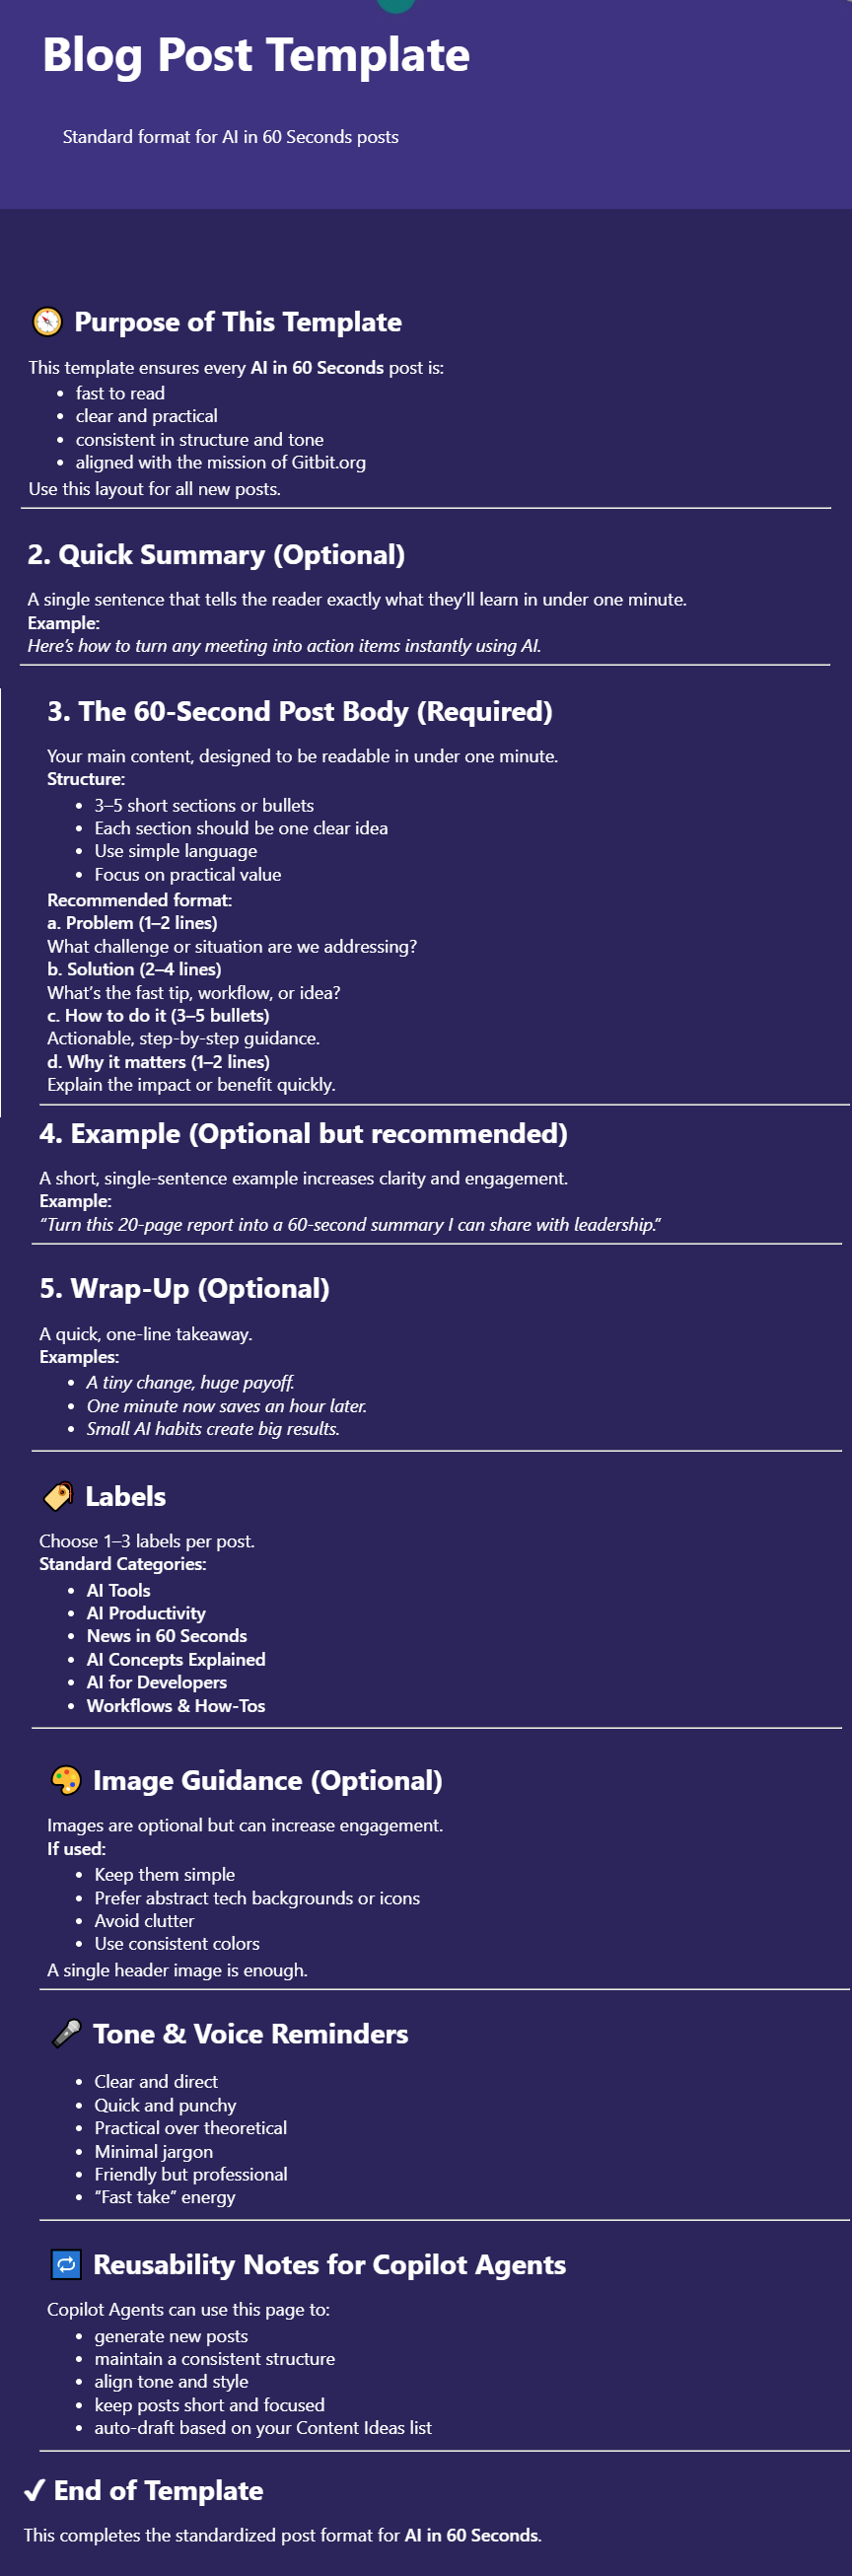
Now, I need to give Copilot instructions on how to write the blog posts. So I created another page in my SharePoint site and asked, 'Can you write the "Blog Post Template" page that Copilot will use to write the blog posts for me?'
Then I copied that data into another blog page just like the About This Blog page.
 Creating the SharePoint site
Next, I created a plain SharePoint team site. Called it AI in 60 Seconds. Really original, right?
I went ahead and created a SharePoint list on this site, too. The SharePoint list will store the blog articles I'm going to post. It will be, in essence, a repository of drafts that will be published in the future.
Currently, I'm only using the SharePoint site to store the articles that will be published on the blog. In the future, I'll probably expand this. Possibly include social media posts, who knows?
Blog Post List
Then I created a simple SharePoint list called Blogger Posts with the following fields:
- title: limit 60 characters, must be unique
- Published: Yes/No
- Content: Multi-length rich text field
- Labels
Some default posts
Then I asked Copilot for 30 articles that can go on my website. "What are 30 good posts I can do to start this blog off right?" I manually added them to the SharePoint list. I'd like to see if I can create a Copilot agent that will give me the body of the text before I automate any more.
Google Setup
Then I added the site to my search console and Google Analytics.
The first Copilot Agent
Finally, we're ready to build our first Copilot Agent. Now, this first one will be a free Microsoft Copilot agent. Not entirely free, I do pay for a Microsoft 365 Business Premium license, but I don't think of that as a Copilot cost because I use OneDrive, email, etc. Anyway, here's how I did it.
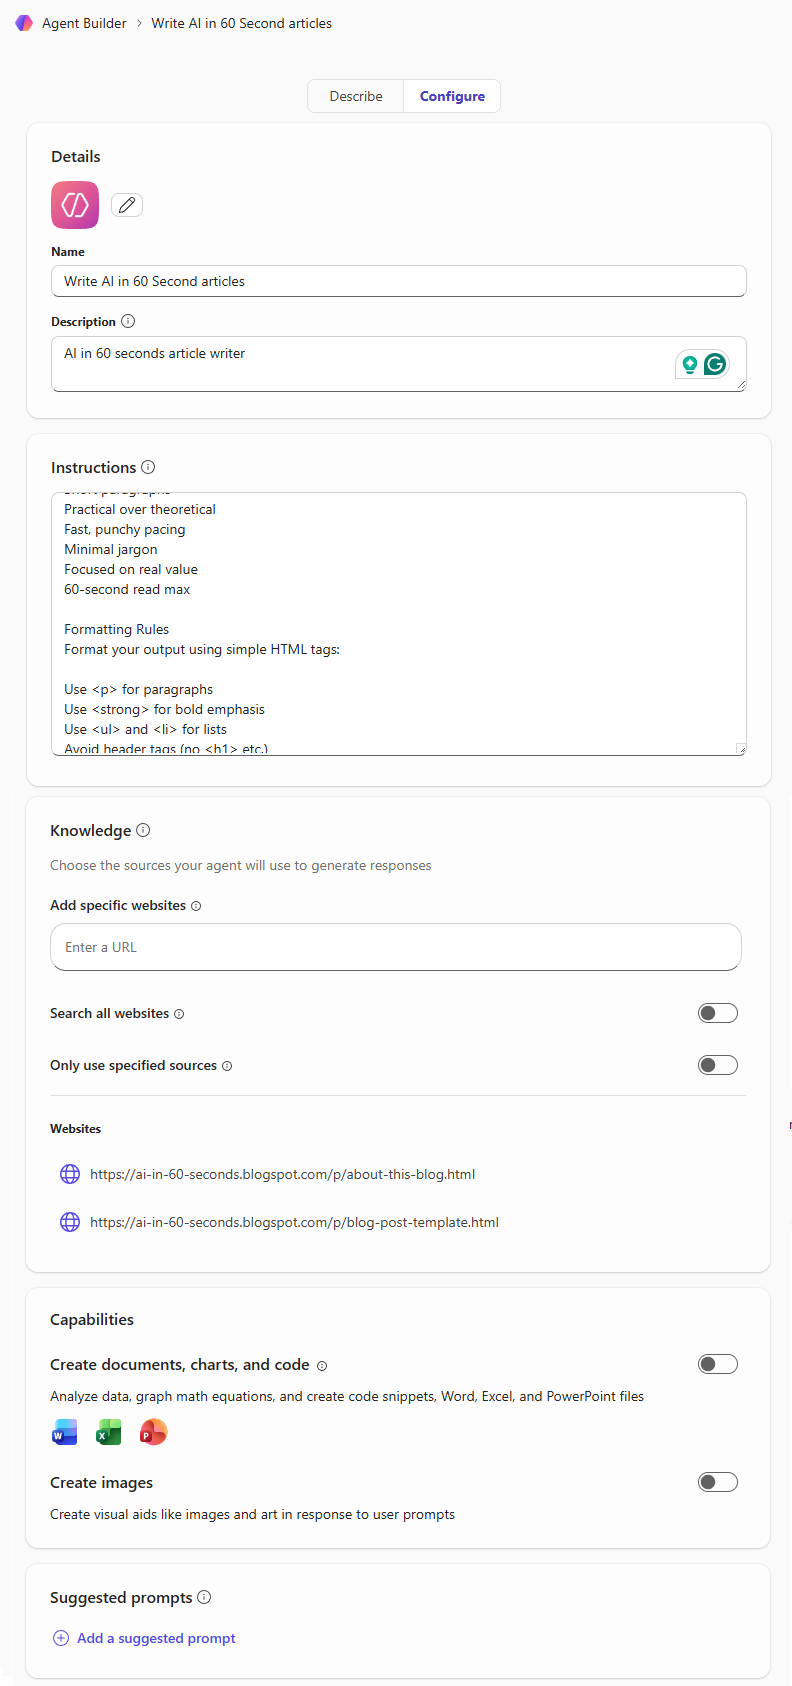
First, I asked Copilot to generate the instructions for itself. Here's what I asked: "Okay, let's start with a simple no-license agent. Can you write the instructions so I can just input the title of the article, and then it outputs the article content?"
- Open https://portal.office.com
- Click New agent
- Gave it a title: Write AI in 60 Second articles
- Gave it a description: AI in 60 seconds article writer
- Copied the Copilot instructions in.
- Entered the two websites (About This Blog & Blog Post Template) into the Add a specified website textbox.
What's the add a specified website?
The "add a specified website" section in Copilot agents is where you add the Copilot AI Agent Knowledge I referenced earlier. It's basically a place where you can give your Copilot agent additional context.
The Copilot instructions look like this:
 The Agent Builder looks like this:
Asking Copilot Agent to write my posts
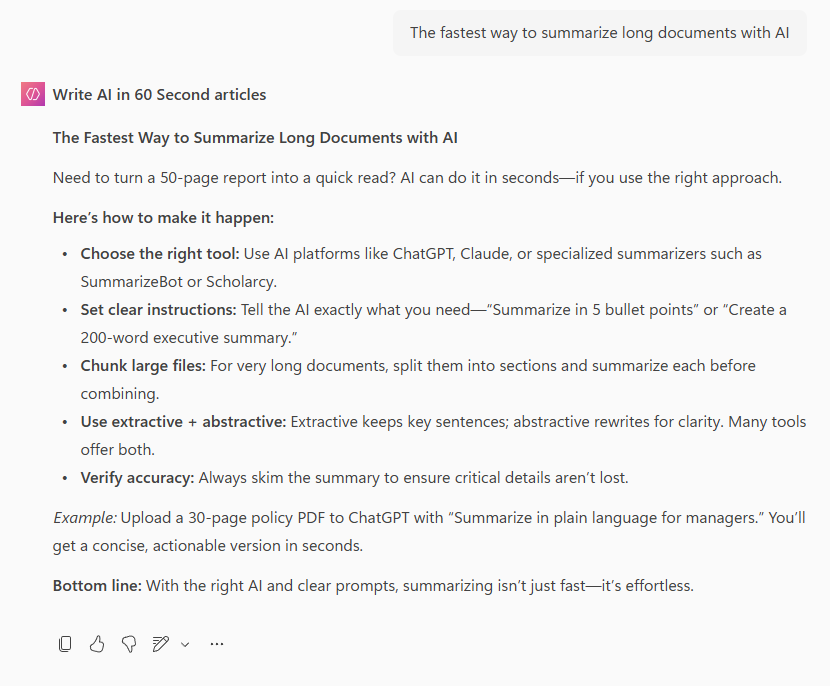
Now, I open the agent by going back to https://portal.office.com and clicking "Write AI in 60 seconds articles". I drop in my first title and success! I have an article. Now, I copy and paste its response back to the SharePoint list Content field I created earlier.
AI Agent to Create Punchy Titles
Then I did virtually the same thing as above, except for more titles. I asked Copilot, "I need another agent to get more article titles. Can you help me write the instructions?" It responded with another set of instructions. The biggest change is that this time I added the "https://ai-in-60-seconds.blogspot.com/" site to the knowledge section.
Power Automate to post my articles
 This article isn't really about Power Automate, so I'm going to move pretty quickly through this. You can run into a lot of issues with Power Automate, though, so it might take some getting used to.
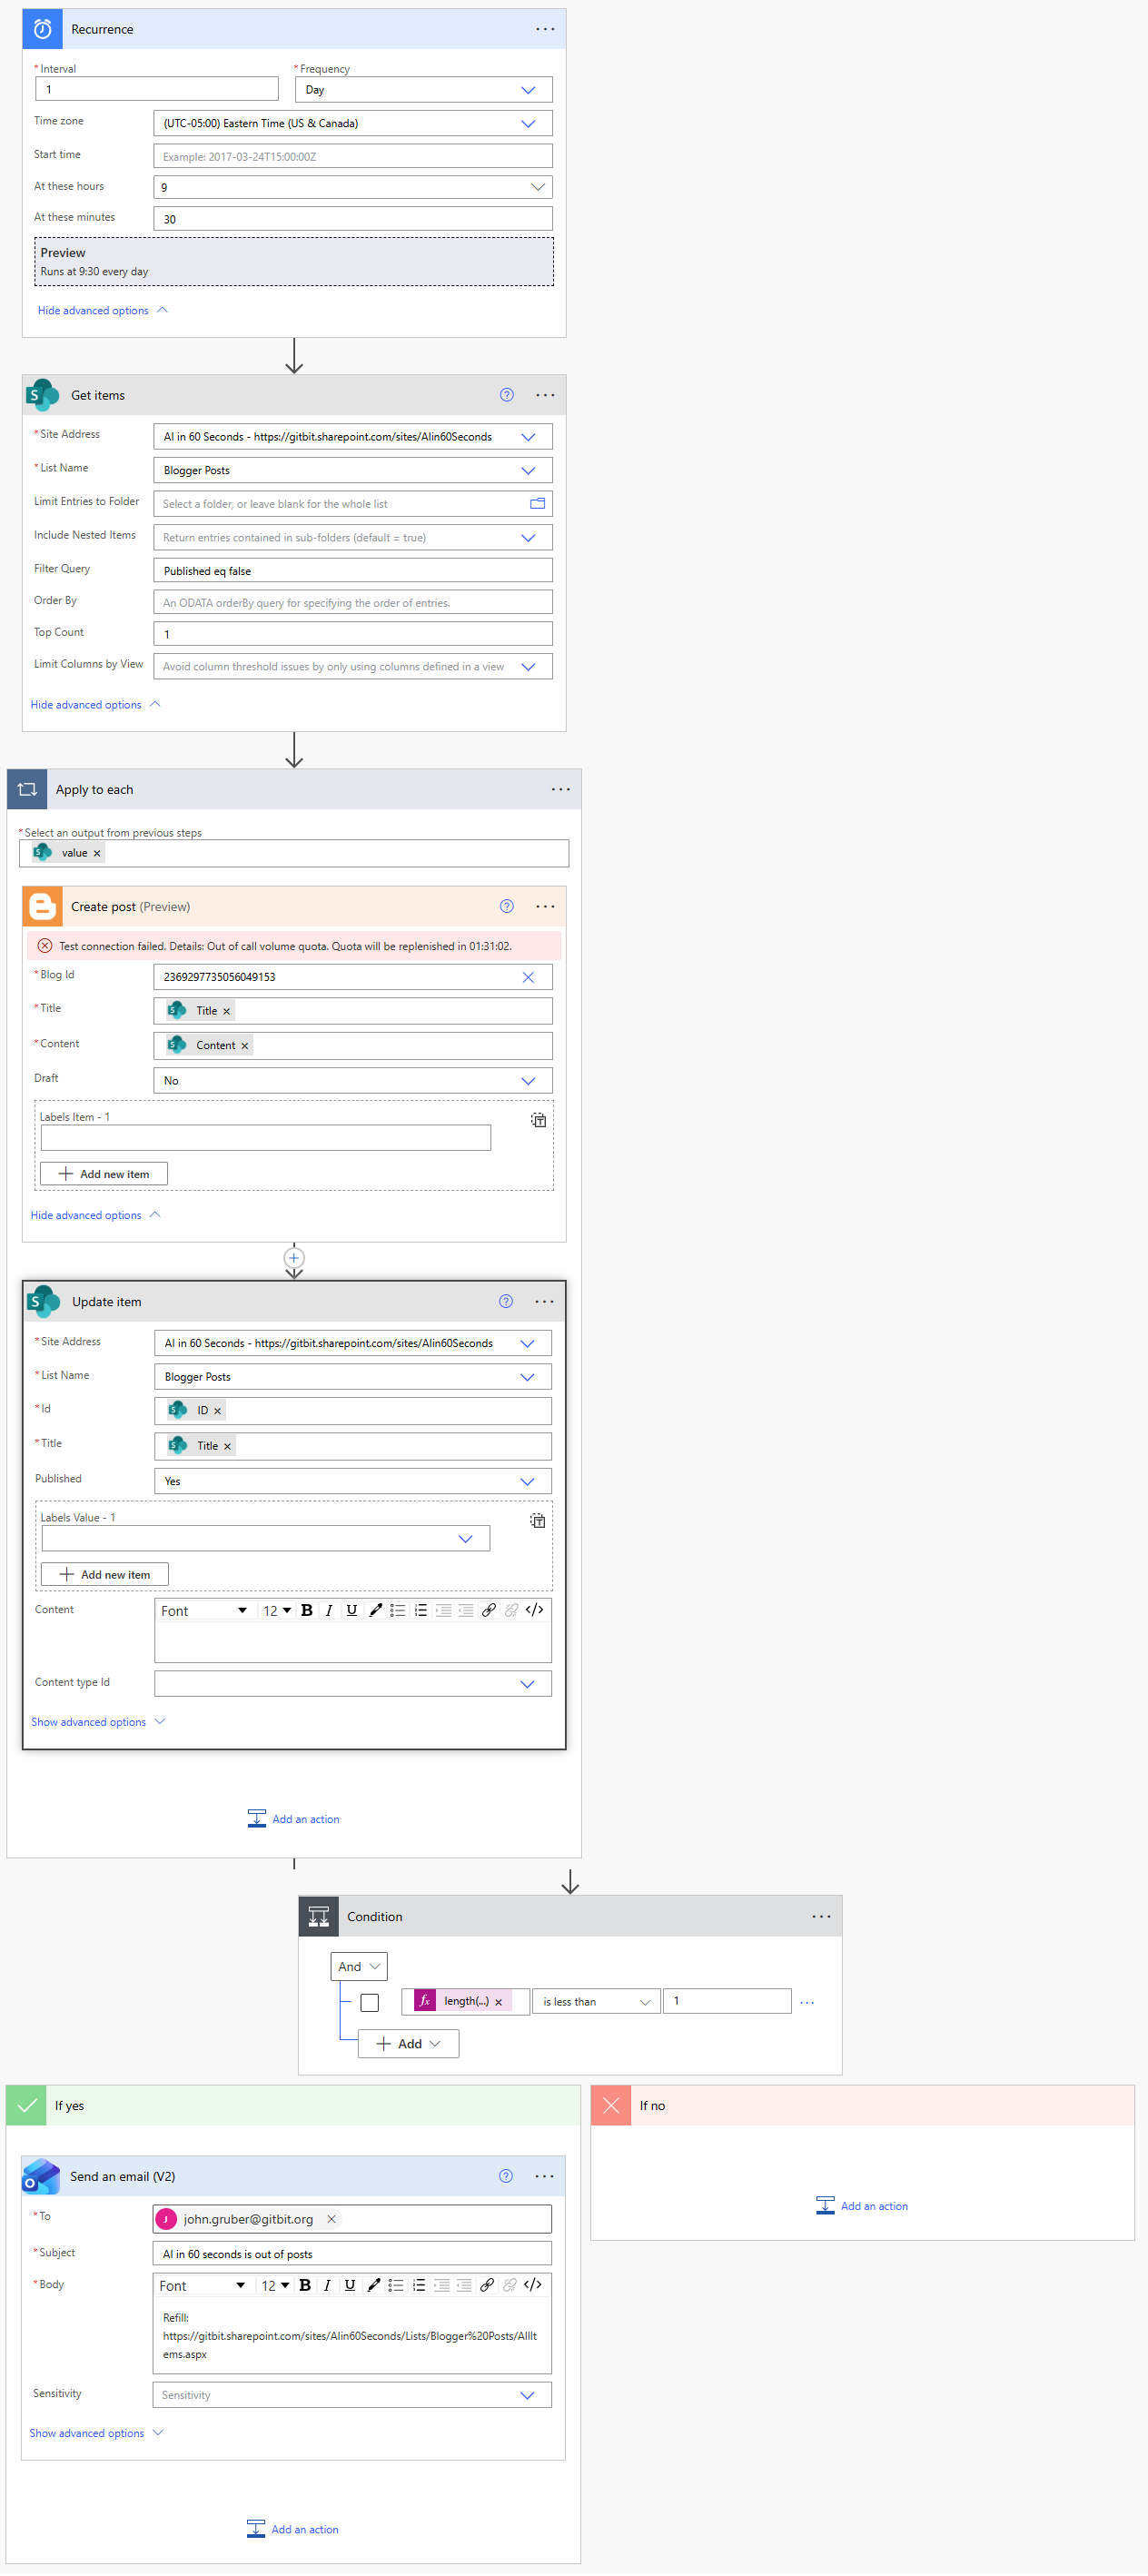
I created a new flow.
- Setting the trigger to be daily at 9:30 am. This means the Power Automate flow will automatically run every day at 9:30 AM
- Created a SharePoint action "Get Items". Set the Filter Query of "Published eq false" and Top Count 1. This tells the automation flow to get the SharePoint items in the list I created earlier. Then filter the results to only get the items that have "published" set to false. Finally, the Top Count 1 tells it to only return 1 item.
- Created an "Apply to each" on the SharePoint items. This will loop through every item that's returned in step 2. There's only one item, but using an Apply to each will set variables for me and make it easier to read later on.
- Inside the "Apply to each", I used the "Create Post" Blogger action. I authenticated with my account and told it to post in the AI in 60 seconds blog. Then I set the title and content using the SharePoint item fields.
- Still inside the "Apply to each", I created a SharePoint "Update Item" action that sets the published to true on the SharePoint item I just posted. That way, it will track which articles it has posted and won't repost any articles.
- After the "Apply to each", I added a condition that IF "length(body('Get_items')?['value'])" is less than 1, then send an email to myself saying "I'm out of AI in 60 seconds" posts. In short, that weird string says, "If you didn't find any items in the SharePoint list that aren't published, send me an email."
That's it. Now, I have a semi-autonomous blog poster. This is only step 1, though. I'm going to need social media posts to share the content. I'll also be moving to a Copilot Studio license to check out the more advanced options, too, so check back soon.
![AI Agents vs Chatbots vs LLM Apps [Simple Breakdown]](/assets/imgs/docs/chatbot-llm-app-ai-agent-1200-ajzwu1rr.png)