How To Block SPAM (Cold Emails) In Microsoft 365

SPAM or cold emails have been exploding recently on my own personal e-mail as well as my clients'. I think it's caused by a perfect storm of three things:
- CRMS have gathered and shared millions, if not billions, of e-mail addresses with their users. It’s the latest phase in CRMs.
- AI has allowed people to customize every email, making it more challenging to catch SPAM / cold emails.
- AI has caused SEO sales to plummet, so businesses are now trying to find new growth opportunities and turning towards cold email more.
I've tried four different ways to block cold emails in Microsoft 365 with varying degrees of success.
- Block CRM platforms.
- Block help, info, and shop domain names.
- Set Junk Email filtering to HIGH.
- Set Junk Email filtering to only allow specific senders.
I’m breaking this document into multiple sections. 1st, I’ll discuss how to set up each block in Microsoft 365. Then I’ll finish with “How to Avoid Being Blocked in Microsoft 365” in case you’re accidentally finding your way to being blocked by these rules.
Why Block CRM Platforms in Microsoft 365
Using the Exchange admin center, you can create mail flow rules that explicitly find and block e-mail sent through CRM platforms such as Instantly.ai.
Pros of Blocking CRM Platforms in Microsoft 365
- Mail flow rules can be used to block emails from your entire organization or a subset of users.
- Blocking emails sent through CRMs is relatively safe. Current customers and prospects won't open a CRM platform to find and e-mail you.
- Emails can be completely blocked or sent to your junk e-mail folder. So, you won't see them at all, or they'll be filtered appropriately.
Cons of Blocking CRM Platforms in Microsoft 365
- It requires an admin, either a global Microsoft 365 admin or Exchange admin. So if you aren’t an IT admin in your organization, you’ll need to share this webpage with your admin team and ask them to set it up on your behalf.
How to Block CRM Platforms from Emailing Your Org in M365
It’s relatively easy to block CRMs using the Mail Flow Rules in Exchange Online, but before I get into it, you’ll need to understand how Mail Flow Rules work in Exchange Online so you can set Exchange to block emails or send emails to the junk email folder.
Our rules will typically follow this pattern:
If headers show the email was sent from a CRM & the email is sent from outside our environment, then reject the message with the error message: “Recipient not found”.
We’re going to block the email with an error message of "Recipient not found" because it tells the sender, "This is the wrong email address". The CRMs, or at least the salesperson, should flag your email as “incorrect” or “Wrong” so the database removes your email address from their lists.
How Mail Flow Rules Work
In short, a mail flow rule in Exchange Online follows a simple pattern. For every email that’s received in Exchange Online, the mail flow rules will trigger. They each follow a simple pattern:
Apply this rule if THIS then Do the following THING Except if THAT
You can also read this as: If THIS then DO except if THAT
There are three primary sections of a mail flow rule:
- The IF block
- The THEN block
- The EXCEPT block.
The Apply this rule if (IF Block)
This is when the rule will be applied. Microsoft has a ton of options built in for the IF rule. For example, if you wanted to block all emails from a specific sender, you would build the rule as follows:
Apply this rule if: the sender’s email address is x@y.com
When you apply the IF rule, you are customizing when the rule will be applied. If you send or receive an email and it doesn’t match the IF statement, the rule won’t be applied.
You can have multiple IF rules. For example, you can have a rule that says “If the sender is inside your organization AND if the subject line contains: ENCRYPT”… then do something.
The Do the following (THEN Block)
The THEN block is what you want to happen IF the email matches your query. For example, if I want to block all emails from a certain sender, it would read something like “IF the sender is x@y.com THEN Block the email”
Microsoft labels the THEN block as “Do the following”, so anything you want to happen when an email matches the IF block you put in the Do the following block.
Except if (Except Block)
The Except If rule is a way to exclude certain things from meeting a rule. For example, you may want to block all emails being delivered to a certain mailbox except if the sender is a specific person. So the rule would look like:
IF the sender is outside your organization AND the email is sent to support@gitbit.org THEN block the email EXCEPT IF the sender is john@gmail.com
So, the rule above would block anyone from emailing support@gitbit.org except for john@gmail.com
How to Block Instantly.AI Emails from Being Delivered to M365
We’re going to block all instantly.ai emails from being delivered to your entire organization. Instantly is a VERY POPULAR CRM for cold emails. Blocking them will block 20% of the cold emails your organization is receiving.
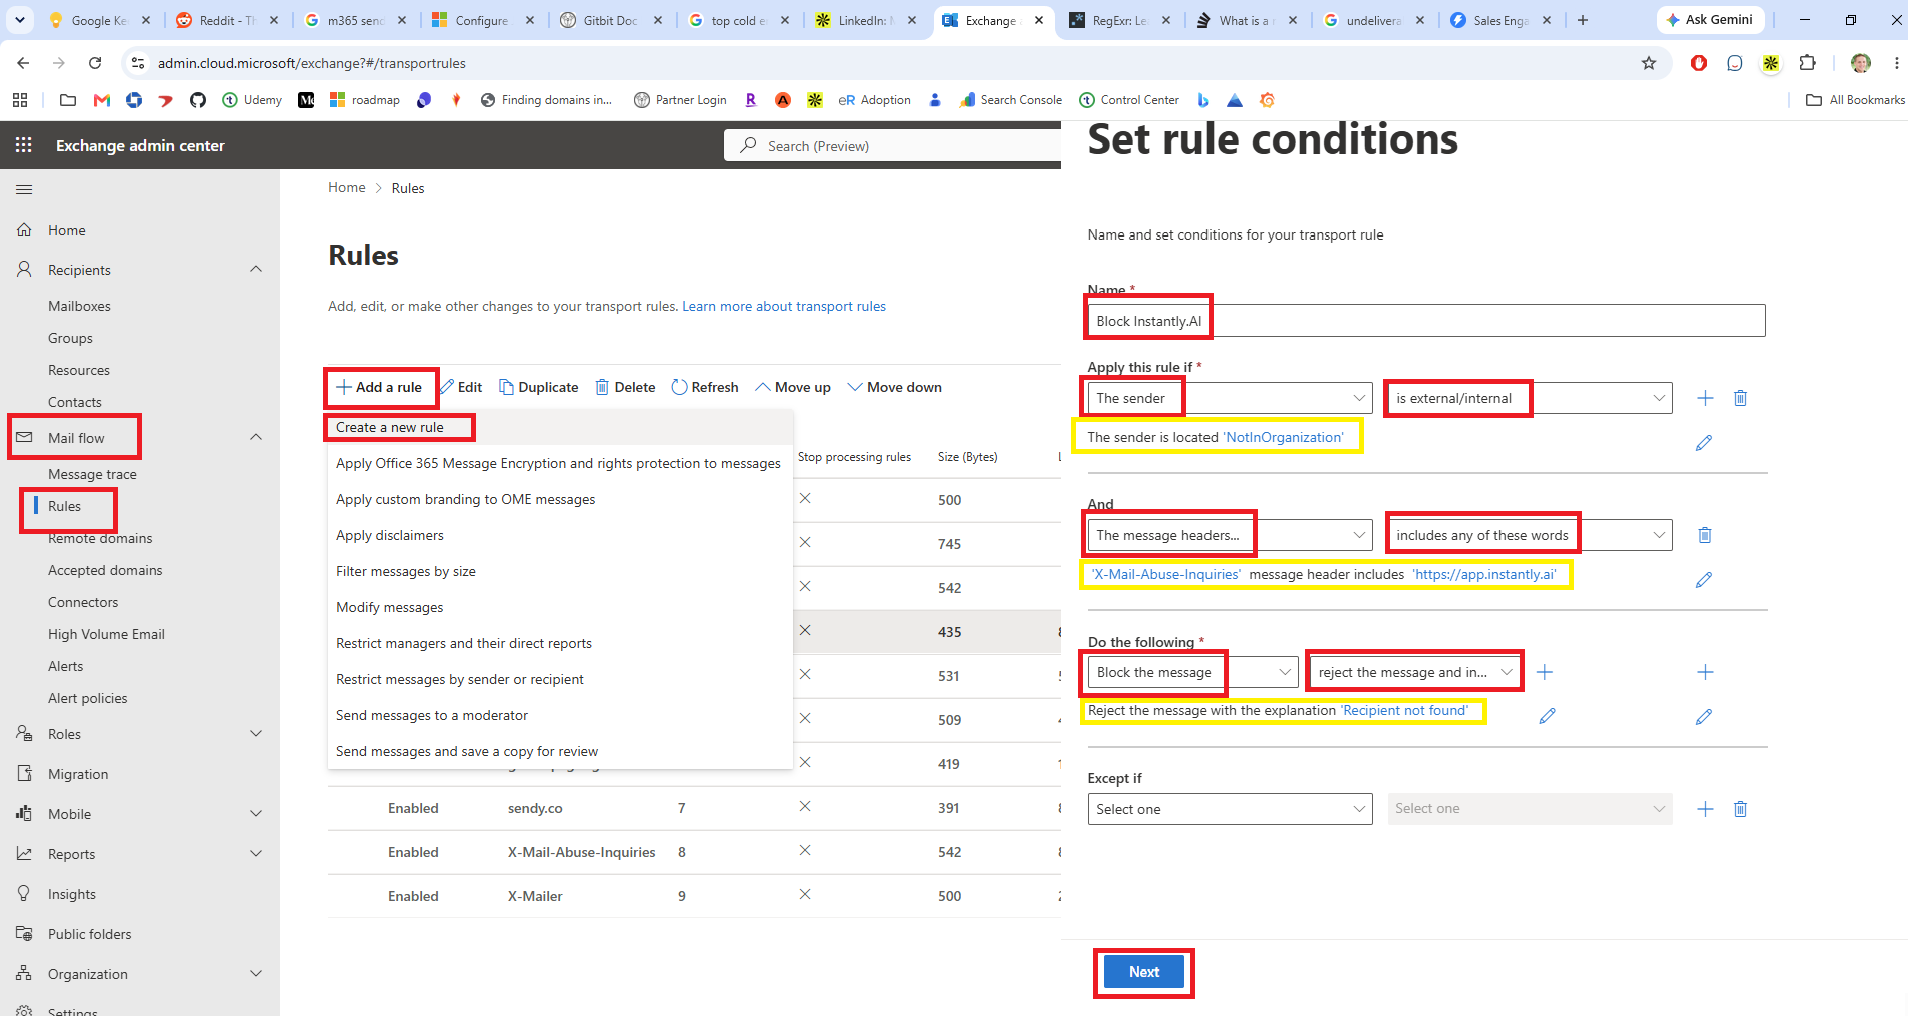
- Open Exchange Online Admin Center > Mail flow > Rules.
- Add a rule > Create a rule.
- Name: Block Instantly.AI
- Apply this rule if: The sender is external/internal: External.
- Add condition
- And: The message headers include any of these words:
- Specify header name: X-Mail-Abuse-Inquiries
- Specify words or phrases: https://app.instantly.ai
- Do the following: Block the message > reject the message and include an explanation: Recipient not found
- Click Next > Next > Finish
- Click your new “Block Instantly.AI” rule and click the Disabled toggle to enable the rule.
How to Block Gmail API Emails from Being Delivered to M365
We’re going to block all Gmail API emails from being delivered to your entire organization. Gmail is a VERY POPULAR email solution, and they allow senders to use the GMAIL API for connecting solutions, for example, CRMs. Blocking them will block a lot of cold emails from your organization.
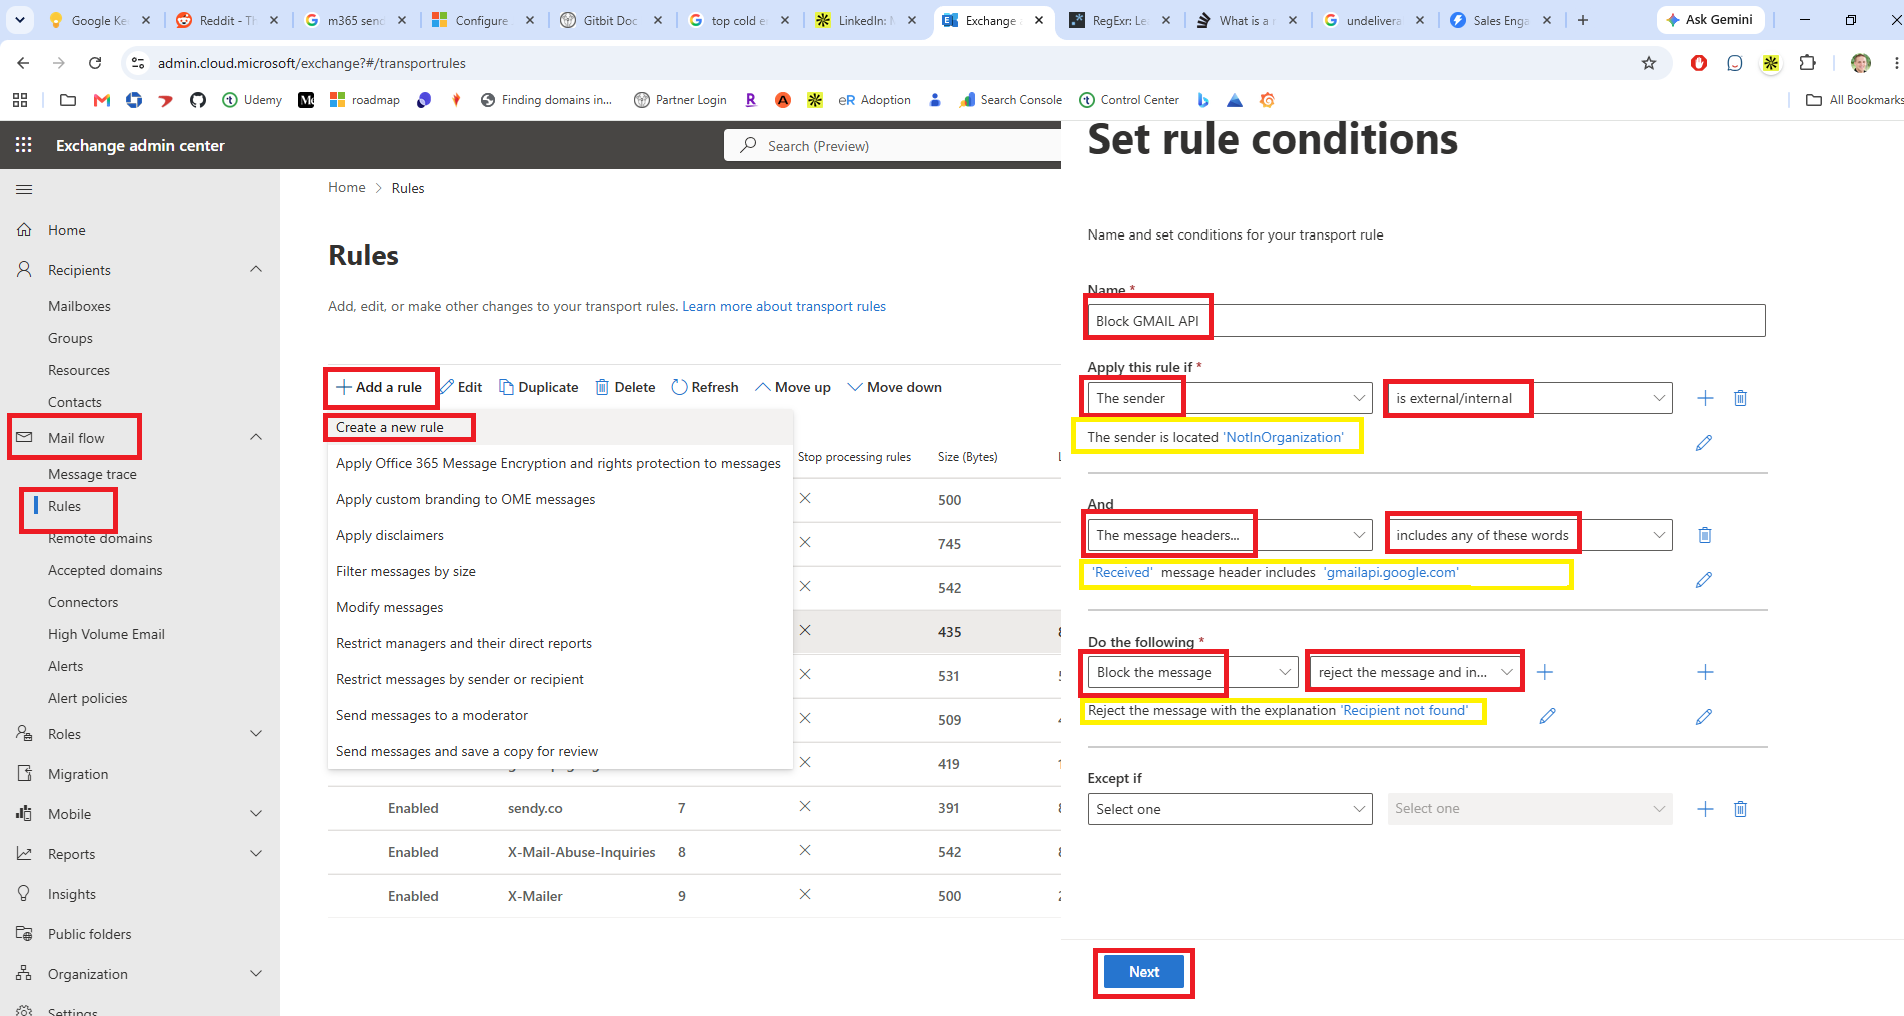
- Open Exchange Online Admin Center > Mail flow > Rules.
- Add a rule > Create a rule.
- Name: Block Gmail API
- Apply this rule if: The sender is external/internal: External.
- Add condition
- And: The message headers include any of these words:
- Specify header name: Received
- Specify words or phrases: gmailapi.google.com
- Do the following: Block the message > reject the message and include an explanation: Recipient not found
- Click Next > Next > Finish
- Click your new “Block Gmail API” rule and click the Disabled toggle to enable the rule.
How to Block YAMM Emails from Being Delivered to M365
YAMM is sold as a “Mail merge for Gmail”, so I think it’s supposed to be used for small newsletters, etc. But I’ve never had a newsletter use it. YAMM doesn’t use a specific header; they do use an unsubscribe link that’s pretty easy to find, though.
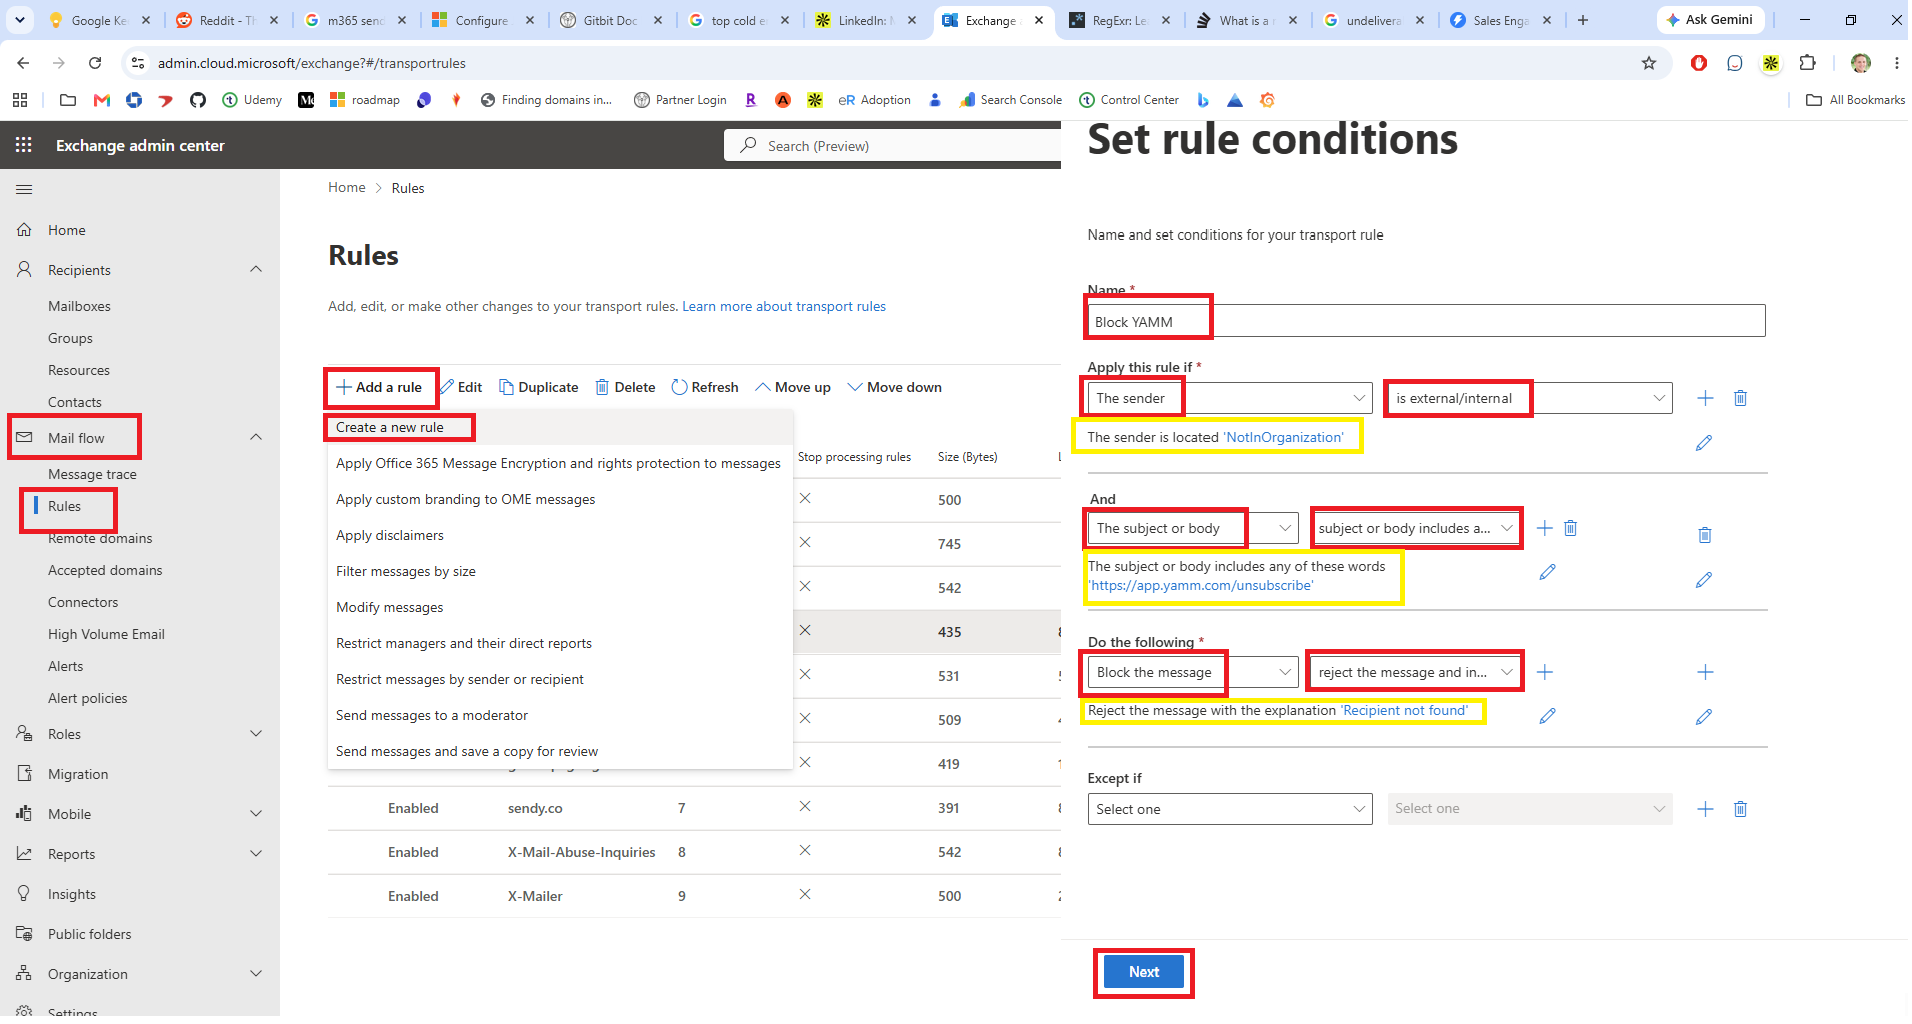
- Open Exchange Online Admin Center > Mail flow > Rules.
- Add a rule > create a rule.
- Name: Block YAMM
- Apply this rule if: The sender is external/internal: External.
- Add condition
- And: The subject or body includes any of these words:
- Do the following: Block the message > reject the message and include an explanation: Recipient not found
- Click Next > Next > Finish
- Click your new “Block YAMM” rule and click the Disabled toggle to enable the rule.
How to Block Apollo Emails from Being Delivered to M365
Apollo is very difficult to detect. It’s actually impossible if they have their Apollo set up in a specific way. We can find some of them, though. Since Apollo recommends having an unsubscribe, and they recommend the text “If you don't want to hear from me again” in the unsubscribe link, we can actually look for that in the body.
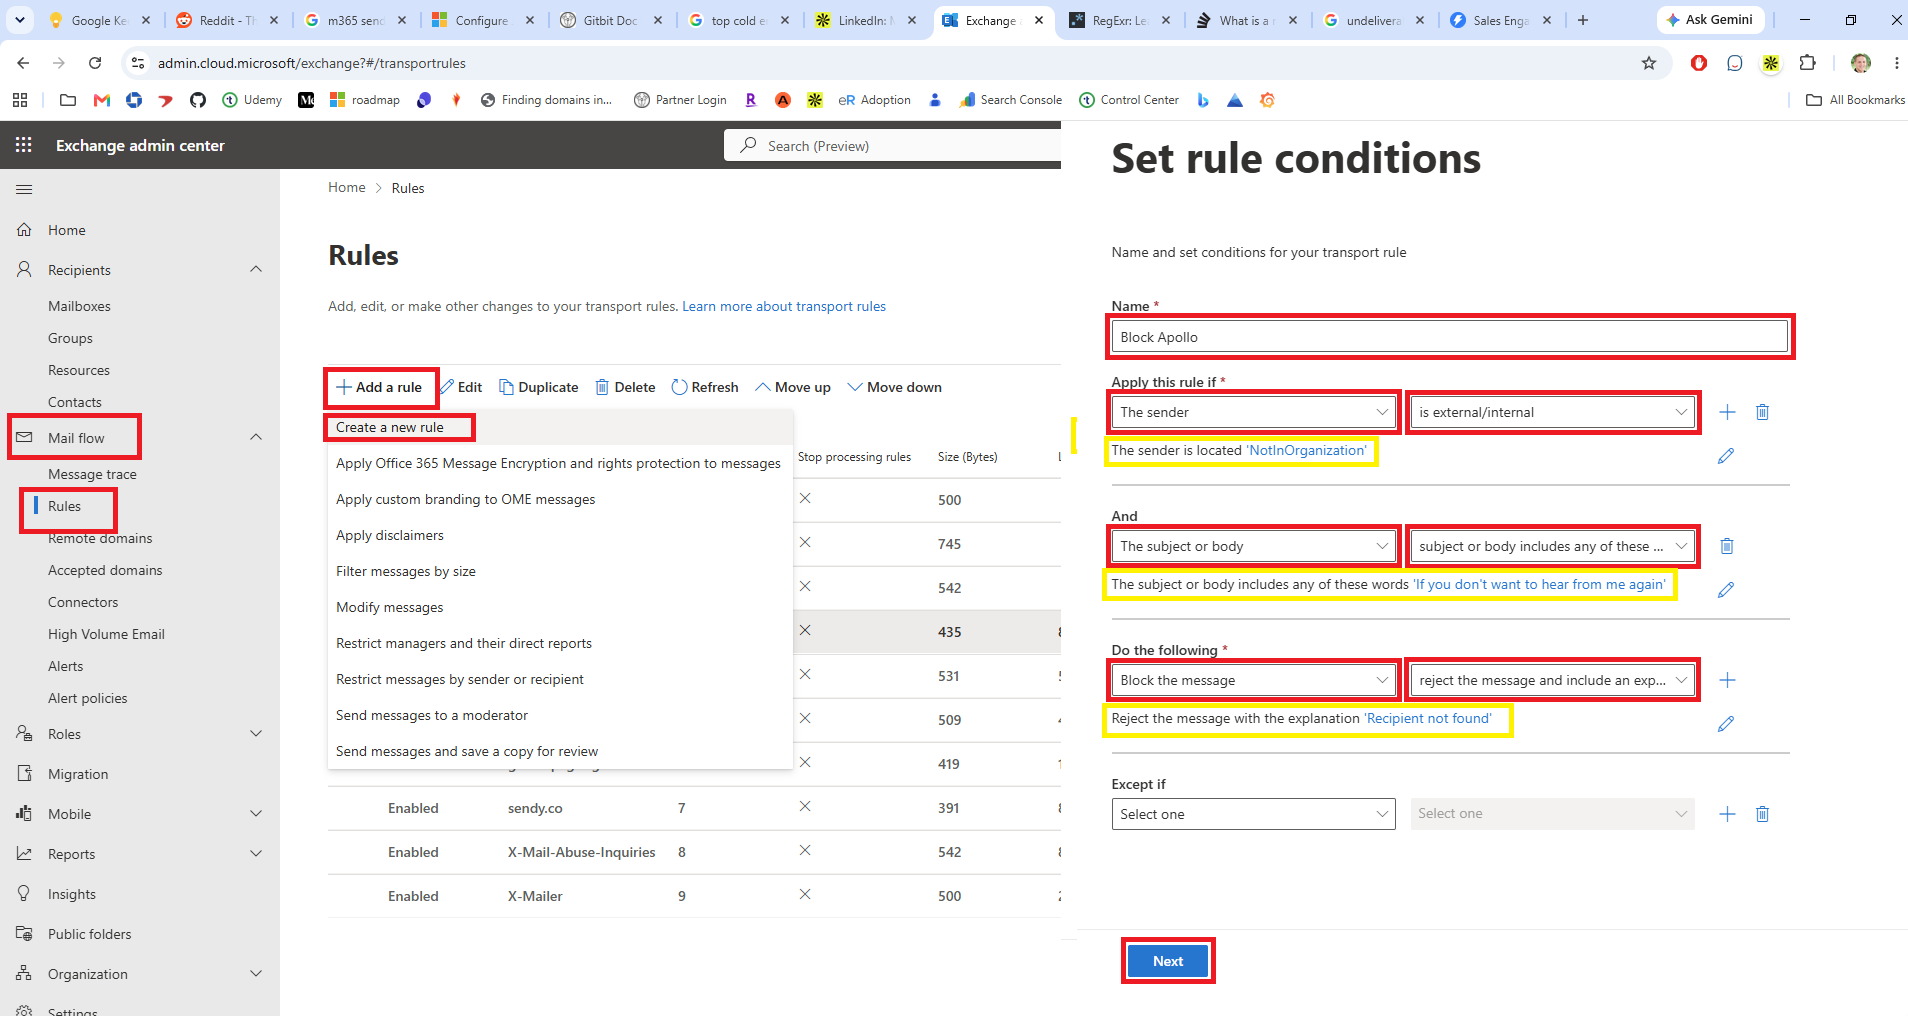
- Open Exchange Online Admin Center > Mail flow > Rules.
- Add a rule > create a rule.
- Name: Block Apollo
- Apply this rule if: The sender is external/internal: External.
- Add condition
- And: The subject or body includes any of these words:
- If you don't want to hear from me again
- Do the following: Block the message > reject the message and include an explanation: Recipient not found
- Click Next > Next > Finish
- Click your new “Block Apollo” rule and click the Disabled toggle to enable the rule.
Why Block Help, Info, and Shop Domain Names
I’ve found some very common “how to avoid getting blacklisted” advice is to set up a new domain to send from. Example: Instead of sending it from Gitbit.org, you should send it from Gitbit.info.
Personally, I’ve never had an email that I needed come from an INFO, HELP, or SHOP domain, but I’d rather not miss something important than be overly aggressive in the blocking, so I typically recommend moving these emails to the junk email folder. But it's pretty easy to simply block these emails as well if you'd prefer.
Pros of Blocking Help, Info, and Shop in Microsoft 365
- Mail flow rules can be used to block emails from your entire organization or a subset of users.
- Emails can be sent to your junk e-mail folder. So, you won't miss something you need, but it won’t show up in your inbox.
Cons of Blocking CRM Platforms in Microsoft 365
- It requires an admin, either a global Microsoft 365 admin or Exchange admin. So if you aren’t an IT admin in your organization, you’ll need to share this webpage with your admin team and ask them to set it up on your behalf.
- You may inadvertently block something someone needs.
- The emails will be delivered to the user’s junk email folder, so they’ll still receive the emails.
How to Block Info, Help, and Shop Domains from Emailing Your Org in M365
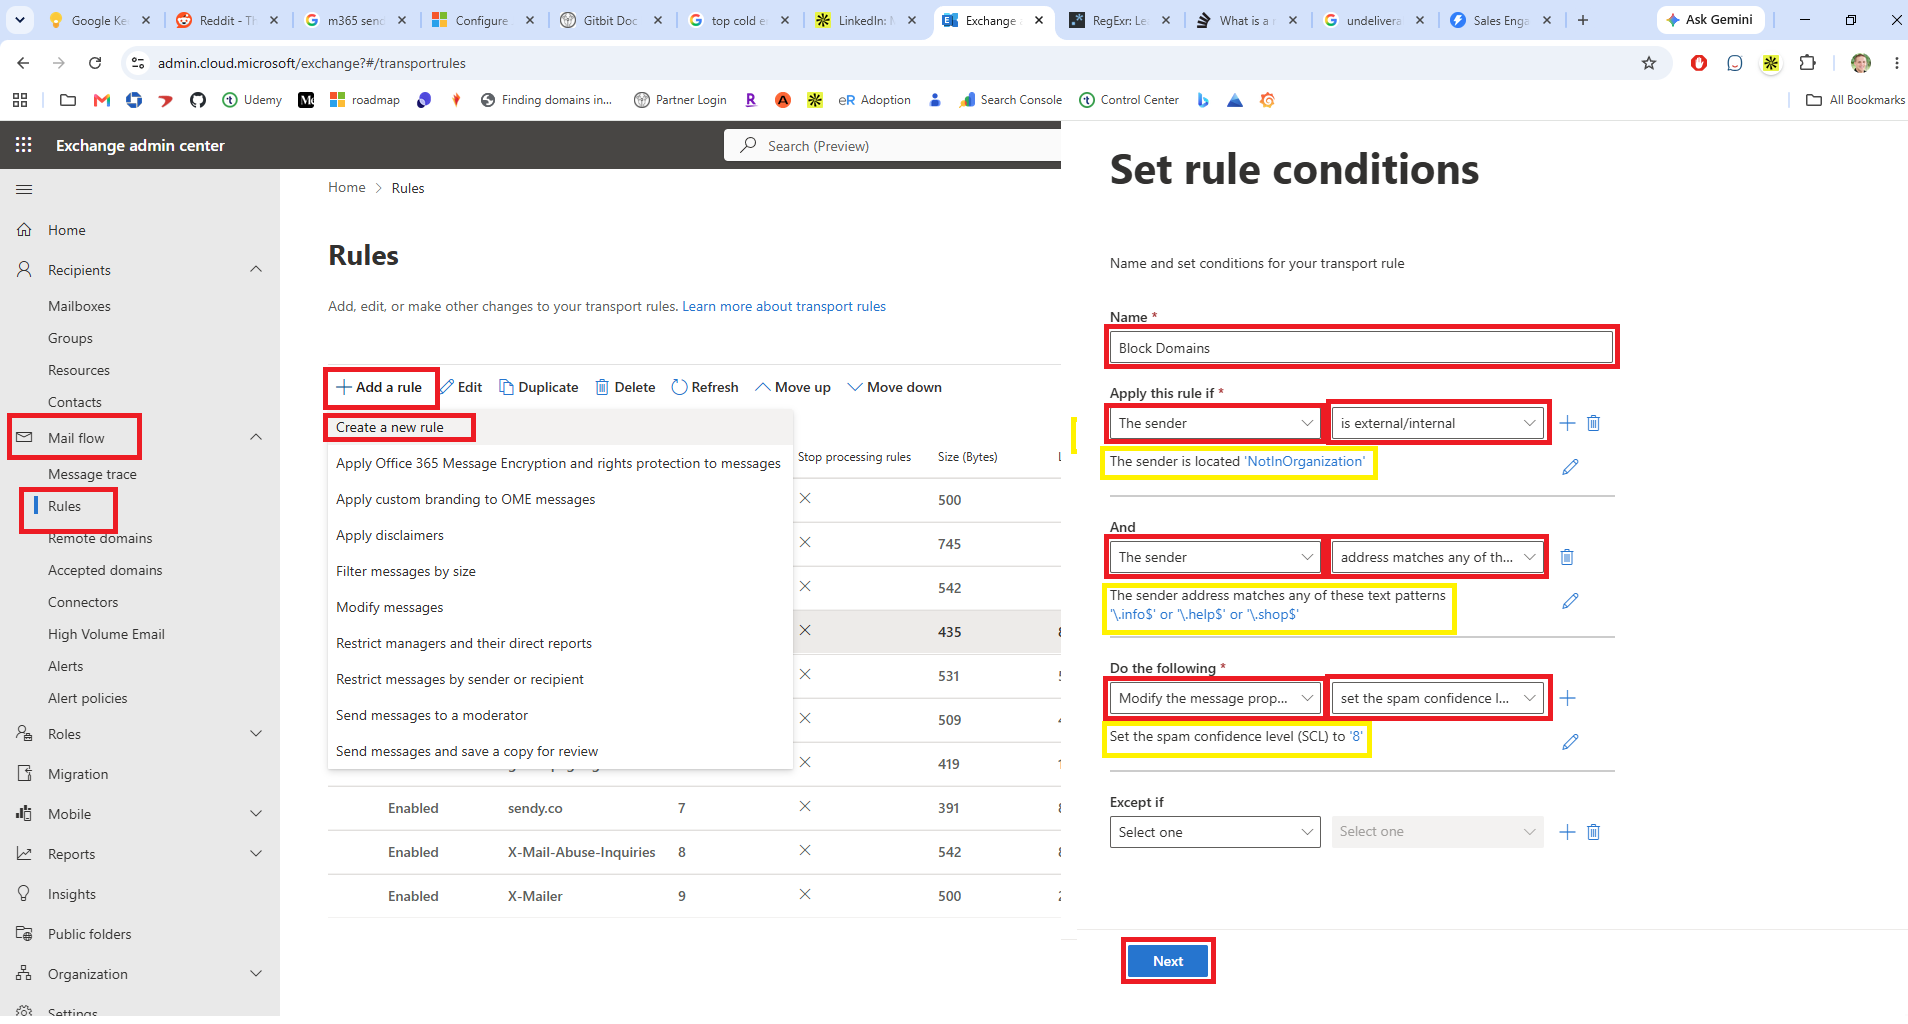
- Open Exchange Online Admin Center > Mail flow > Rules.
- Add a rule > Create a rule.
- Name: Block Domains
- Apply this rule if: The sender is external/internal: External.
- Add condition
- And: The sender address matches any of these text patterns:
- \.info$
- \.help$
- \.shop$
- Do the following: Modify the message properties > Set the spam confidence level (SCL) > 8
- Click Next > Next > Finish
- Click your new “Block Domains” rule and click the Disabled toggle to enable the rule.
- Click Edit rule settings
- Set Match sender address in message: Header or envelope.
Why Set Junk Email Filtering to HIGH
I’ve tinkered with Microsoft’s junk email filters for a couple of weeks now. I’ve found High to work well. In short, it blocks most cold emails but isn’t overly aggressive. There are some pros and cons to using it, though.
Pros of Setting Microsoft’s Junk Email Filtering to High
- You can do it from your mailbox. No admin permissions are required.
- Emails will be sent to your junk e-mail folder. So, you won't miss something you need, but it won’t show up in your inbox.
Cons of Setting Microsoft’s Junk Email Filtering to High
- Emails will be delivered to your junk email folder, so you’ll still receive them and must look at them at some point.
- Sometimes, good emails are caught in the junk email folder, so you’ll need to check the junk email folder regularly.
How to Set Microsoft Outlook’s Junk Email Filtering to High
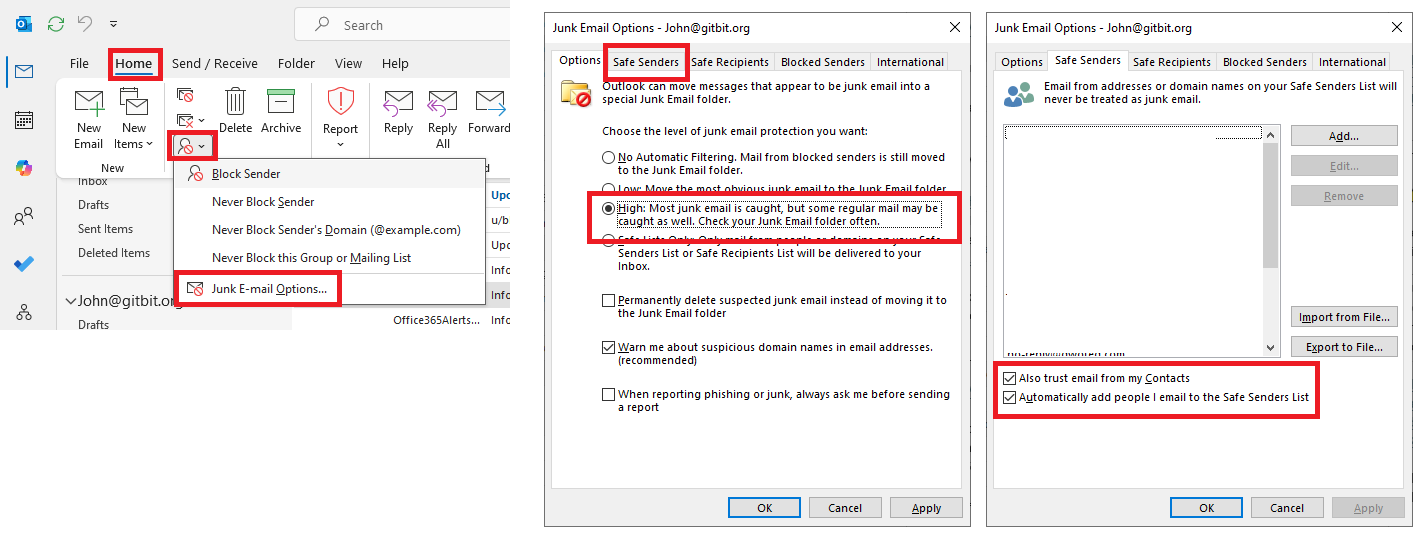
- Open Outlook > Home ribbon > Block Sender > Junk E-mail Options…
- Choose the level of junk email protection you want: High
- Click Safe Senders
- Check both:
- Also trust email from my Contacts
- Automatically add people I email to the Safe Senders List
How to Unblock Junk Email in Outlook
Sometimes, emails will end up in your junk email folder. It’s straightforward to automatically move them back to your inbox. The first option is to simply email them.
Since we automatically add people you email to the Safe Senders List, you can email the person, and they’ll be added to the safe senders, and any emails they send after that will land in your inbox.
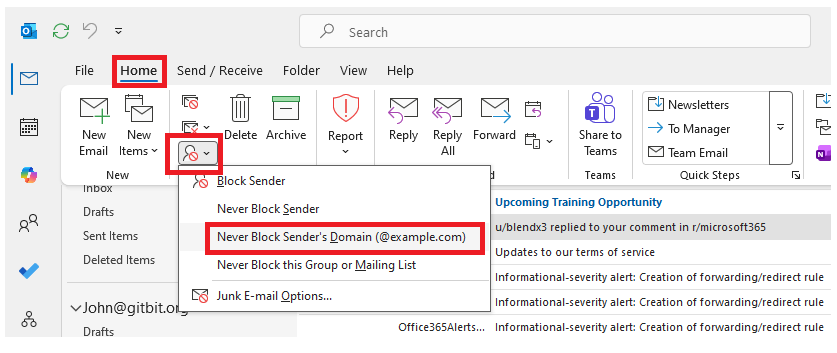
Another way is by manually adding the domain to your safe senders list:
- Open the email in Outlook > Home ribbon > Block Sender > Never block sender’s domain.
Why Set Junk Email Filtering to Only Allow Specific Senders
Setting junk email filtering to only allow specific senders is very aggressive. In short, if you haven’t whitelisted the sender, they’ll end up in your junk email. At least, at first, you’ll get a lot of good emails in your junk email folder. Over time, you’ll train your inbox to send emails to your inbox.
This rule works great for some C-level and director-level employees. C-level and director-level employees get a LOT of cold emails. It’s crazy how many cold emails you receive once your title and email address end up in the CRM systems.
Pros of Setting Microsoft’s Junk Email Filtering to Only Allow Specific Senders
- You can do it from your mailbox. No admin permissions are required.
- Emails will be sent to your junk e-mail folder. You won't miss something you need, but it won’t show up in your inbox.
- Once trained, it’s easy to manage.
Cons of Setting Microsoft’s Junk Email Filtering to Only Allow Specific Senders
- A lot of good emails will end up in your junk email folder, at least at first.
- You’ll need to keep a close eye on your junk email folder.
How to Set Junk Email Filtering to Only Allow Specific Senders
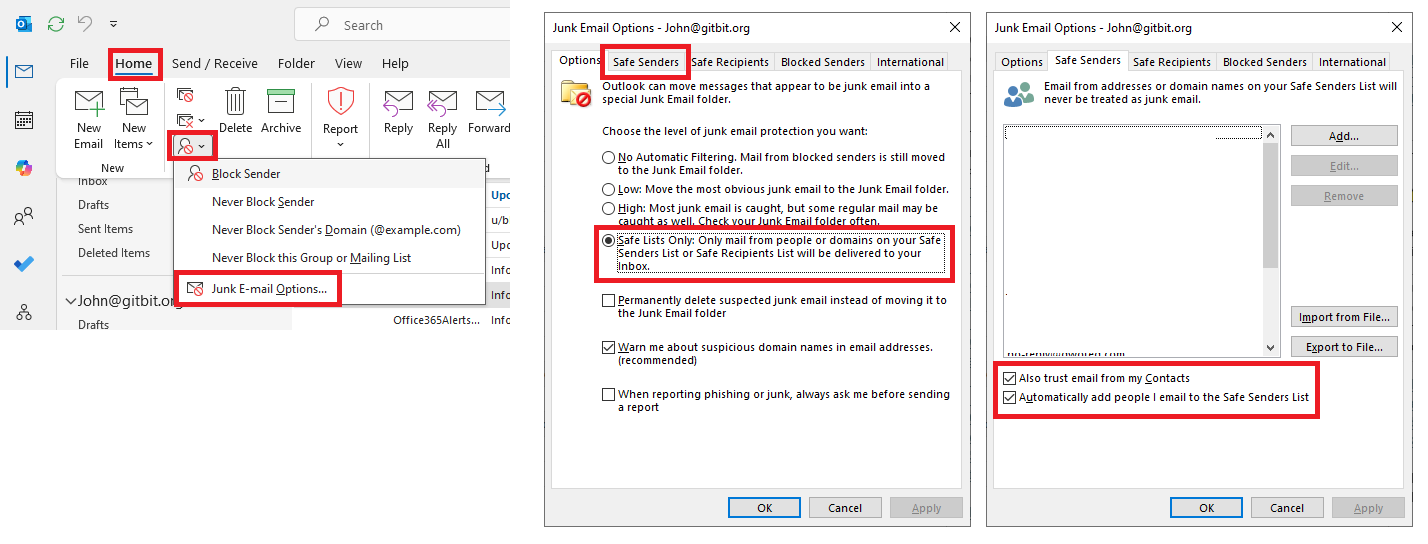
- Open Outlook > Home ribbon > Block Sender > Junk E-mail Options…
- Set Choose the level of junk email protection you want: select Safe Lists Only
- Click Safe Senders
- Check both:
- Also trust email from my Contacts
- Automatically add people I email to the Safe Senders List
How to Unblock Junk Email in Outlook
A lot of emails will end up in your junk email folder, at least at first. You’ll need to manage the safe senders list. The first option is to email someone because that automatically adds them to your safe senders list.
Since we checked the box to automatically add people you email to the Safe Senders List, you can email any email address, and it will be added to the safe senders list, which will start delivering the emails to your inbox.
Another way is by manually adding the domain to your Safe Senders List:
- Open the email in Outlook > Home ribbon > Block Sender > Never block sender’s domain.
How to Avoid Being Blocked in Microsoft 365
Summary:
- Take a moment to review https://www.gitbit.org
- Manually type a unique email in your favorite email client
- Send it.
Lastly, if you’ve found your way to this webpage because I, John@gitbit.org, have blocked you, it’s probably because you sent me an email from a CRM.
To get an email past my SPAM filtering, you’ll need to open the Outlook app or your default email client, manually type in the subject and body, then send the email to me.
It also helps if your email is unique. So, take a moment to review Gitbit and figure out what I do, and try making your email more unique to me.