What Is a Microsoft 365 License Audit? (Step-by-Step Optimization Guide)

A Microsoft 365 license audit is a thorough review of a Microsoft 365 environment, typically designed to cut costs. It does this by removing unnecessary licenses or replacing more expensive licenses with cheaper alternatives. An audit may have two goals:
- Cut costs
- Surface hidden non-compliance
In this guide, I’ll be focusing solely on cutting costs.
5 Ways to Cut Costs During an M365 License Audit
There are five ways to cut your Microsoft 365 bill.
- Remove licenses from disabled users.
- Remove licenses from inactive users.
- Downgrade licenses on over-licensed users.
- Stop paying for unassigned licenses.
- Redefine the license terms.
Each of these 5 ways needs to be addressed separately.
Remove Licenses From Disabled Users
For several reasons, there will typically be user accounts that are disabled, meaning no one can log into them, but they’ll retain a license. Typically, a disabled account does not need a license. You can convert the mailbox to a shared mailbox and migrate the data to another account or locally to retain access to the data. You can also implement retention policies to keep the data at its current location.
Remove Licenses From Inactive Users
It’s very common for an account to become dormant (no one is logging into the account), but the license remains on the account. Just as with a disabled user account, a user account that is not being used does not need a license. You can safely convert the mailbox to a shared mailbox and migrate the data from the user account. To retain the data for a specified amount of time, you can apply a retention policy to the account.
Downgrade Licenses On Over-Licensed Users
It’s not uncommon to assign everyone in the organization, or everyone in the same role, with the same license. It’s simple, effective, and keeps employees from being upset or feeling less than a colleague. But no two people use the tools they’re provided the same way. While one person may use Outlook on their laptop all day, every day, another employee, with the same exact role, may prefer to use OWA or only use email on their mobile device. Those two users do not need the same license. While it makes logistical sense to assign a new employee with the same license as their peer or as the employee they are replacing, you need to go through each employee’s usage and determine which license is truly best for them.
Veteran tip: Don’t just downgrade a user’s license. Send them an email explaining the change and inform them that if they need an upgrade in the future to reach out to the IT team.
Stop Paying For Unassigned Licenses
While it may (or may not) seem obvious, your organization is billed for every license available to your organization. That means, if you have 50 employees, and 1 leaves the organization. Your IT staff may have it documented to remove the license from the user account. They don’t, however, have it documented to remove the license from the tenant entirely. If that license is removed from a user, you’re still paying for that license. That may make sense if you expect to fill that role in a week or two. But what happens a lot is an organization will restructure, possibly even plan to hire someone new to replace that role, instead, will promote someone from another team (who already has a license), and that license you first removed from the terminated employee lies dormant… Continually being billed to the organization. To get the savings from Microsoft 365, you need to remove the license from your environment entirely.
Redefine The License Terms
While most people who handle billing for Microsoft 365 know, they don’t always realize the savings that can be generated from the license terms.
Microsoft recently changed its terms, so a Microsoft 365 license has a different cost based on the subscription length and billing term. So, an organization that has a monthly subscription and pays monthly for the license will pay 16% or more, as opposed to a yearly subscription with a yearly billing plan.
What’s not so obvious is that an organization can mix and match these licenses. Let’s face it. Most organizations are not going to cut more than 20% of their workforce in a year. So why not have 80% of your licenses on a yearly subscription and yearly billing term, and keep the other 20% on a monthly term?
Who Can Run A License Audit
Any admin assigned to a global reader or global admin role can run a license audit. While it may be possible to pick and choose specific permissions, it’s typically not necessary. While global readers can extract most of the information, a global admin may be required to obfuscate the data in the reports.
What Organizations Should Run a Microsoft 365 License Audit
Organizations of every size should run license audits. Many people believe organizations that have 50 users or fewer don’t need to run a license audit, but that’s simply not true. A Gitbit study of over 200 companies revealed that, on average, businesses waste 22% of their Microsoft 365 budget on unused or underutilized licenses. That number stays relatively true for organizations with as few as 10 users.
Why does that number stay true for organizations with as few as 10 users? Because an organization of 10 users only needs 2 licenses, not being used to have 20% waste.
Who Should Run License Audits
Typically, C-level executives, directors, and managers request a license audit, but I’d encourage technical engineers to run them without prompting them to. It’s an easy win to show your expertise by pointing out where your team or organization can cut costs.
When Should You Run A 365 License Audit?
As an industry best practice, organizations should conduct a Microsoft 365 license audit at least once per quarter, or monthly for high-turnover environments, to actively prevent licensing bloat.
For example, if your organization hires additional staff for Christmas, then it would be wise to run a report after the seasonal contracts expire. It’s also recommended to run another report after 30 days in case an account isn’t properly terminated and sits idle in the organization.
What Tools Do You Need To Run A License Audit?
There are 3 documented ways to run a license audit:
- Using the Microsoft 365 admin center (web browser)
- Using Microsoft PowerShell (command line)
- Using third-party tools
I’ve written this guide to be the most complete guide on planet earth, so I’ll cover all three ways. That way, if you prefer to use PowerShell, you can. If you don’t like PowerShell, you can use the third-party tools. If you have security concerns about third-party tools, you can use the built-in admin centers through a web browser.
How Do You Run A Microsoft 365 License Audit?
As I mentioned above, there are 5 different ways to cut costs in Microsoft 365, and three different ways to review each way, so I’ll break this guide down into 5 sections with 3 sub-sections. I’ll detail exactly how to gather the data using each method. If you run into any issues, the best way to contact me is via email at john@gitbit.org or via LinkedIn www.linkedin.com/in/gruberjl.
How To Find Disabled Users That Still Have A License
This is one of the easier finds. Disabled users don’t need a license, even if they need the data or to retain send/receive from the mailbox.
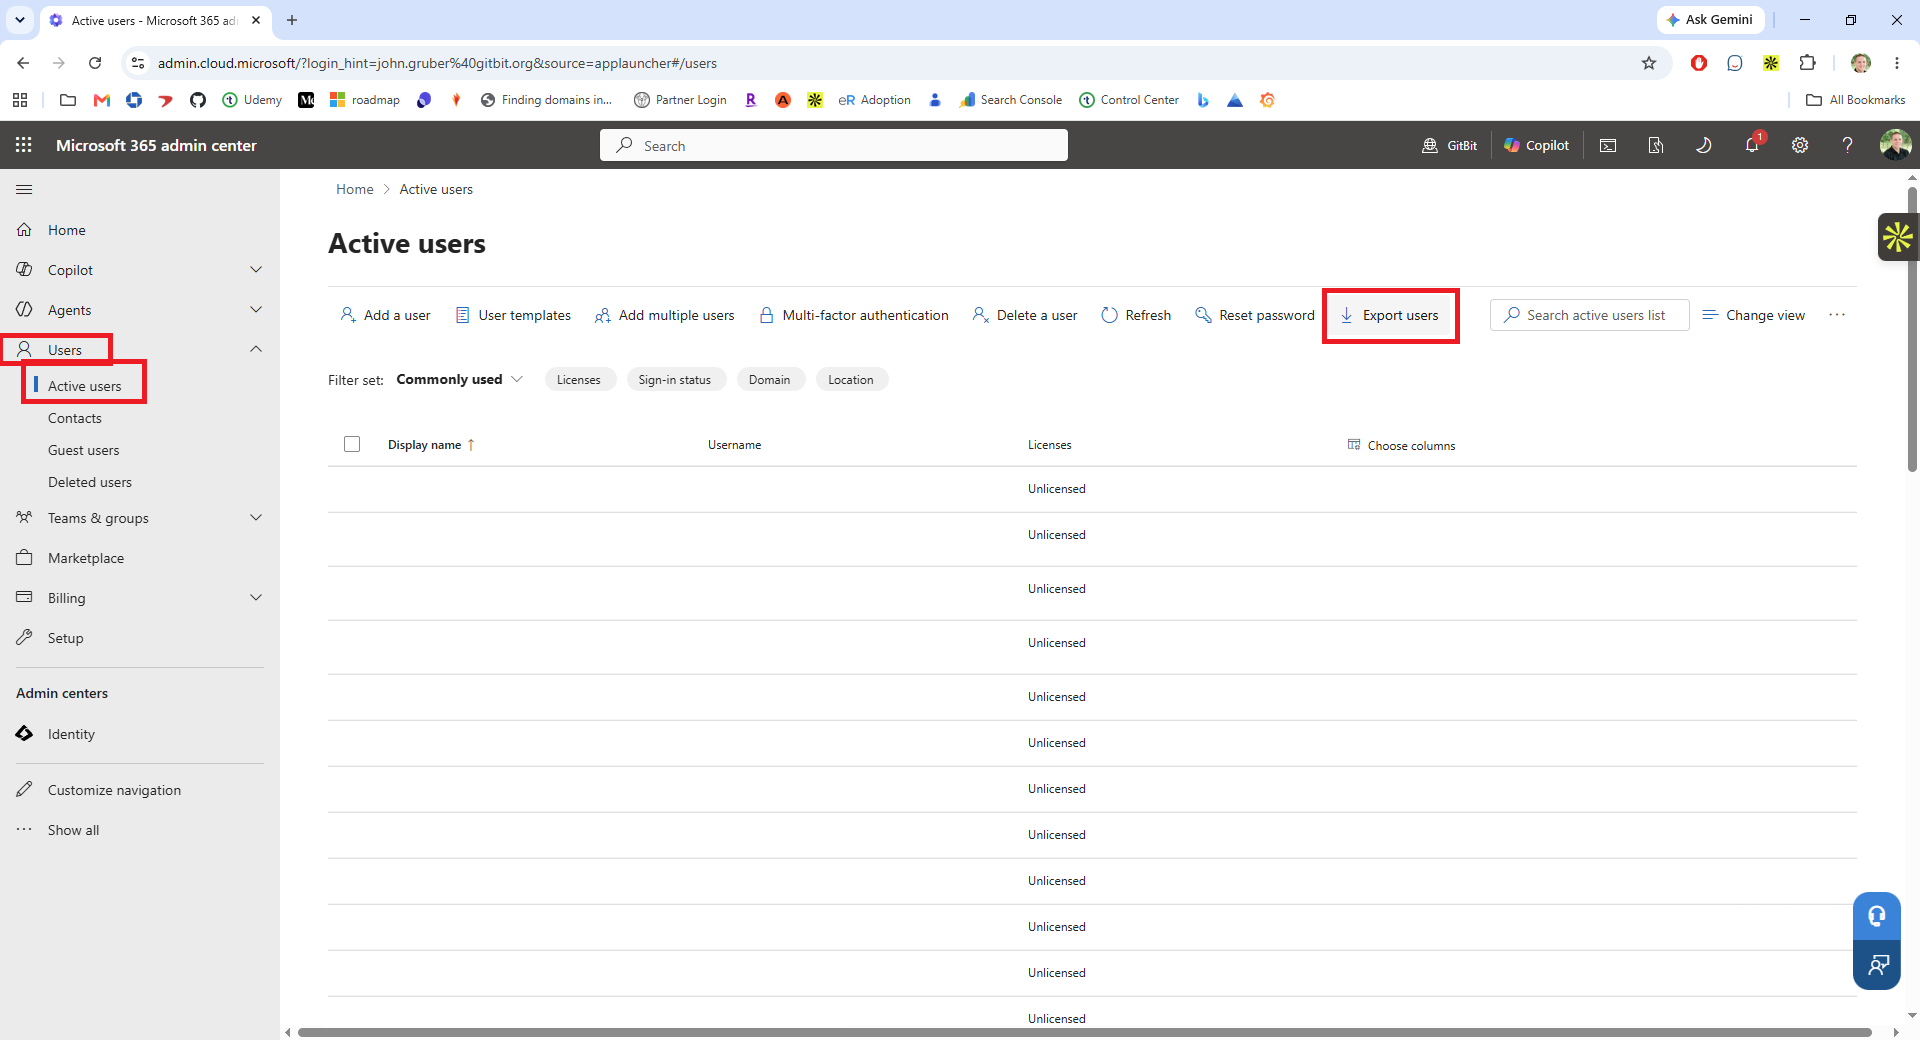
Find Disabled Users Using Microsoft 365 Admin Center
- Go to http://admin.cloud.microsoft/ and log in with your Microsoft 365 admin credentials.
- Click Users > Active Users > Export > Continue.
- Open the spreadsheet.
- In the Home Ribbon, click Sort & Filter > Filter.
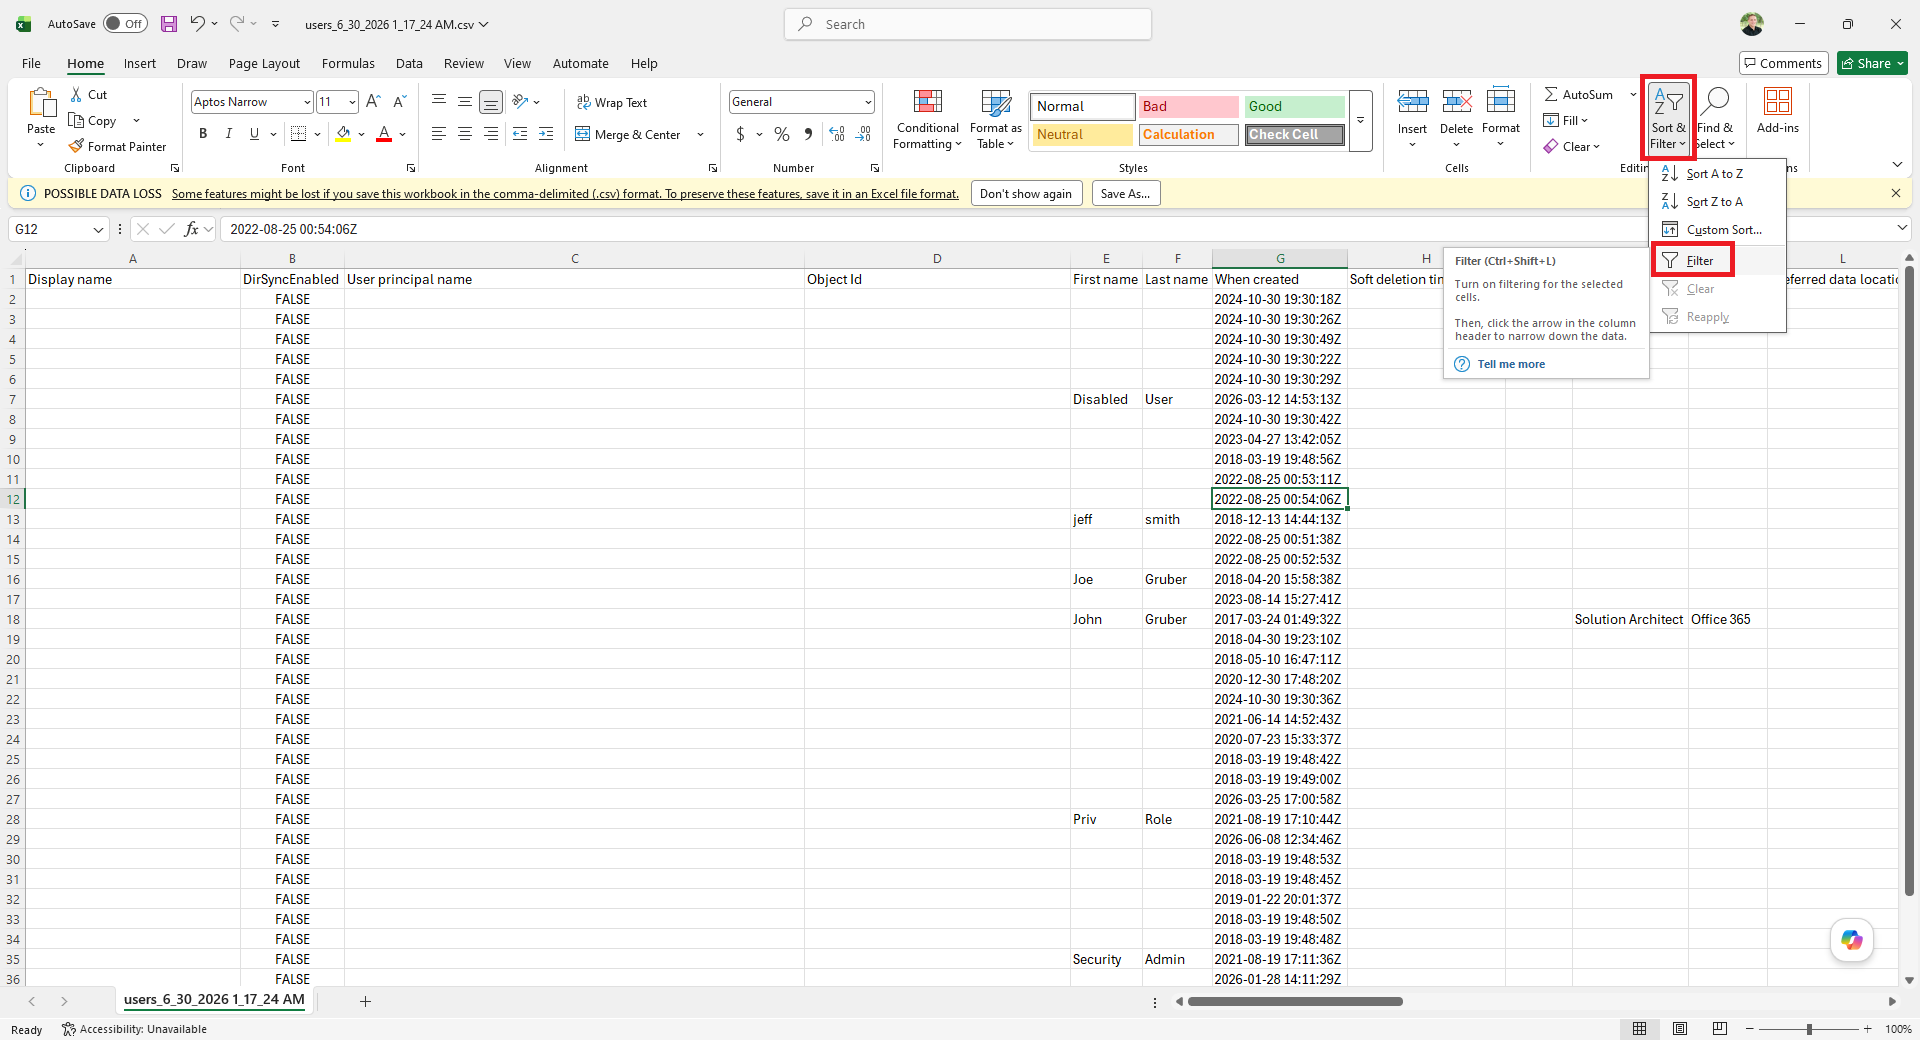
- Click the dropdown in the Licensed column > uncheck Unlicensed > click OK.
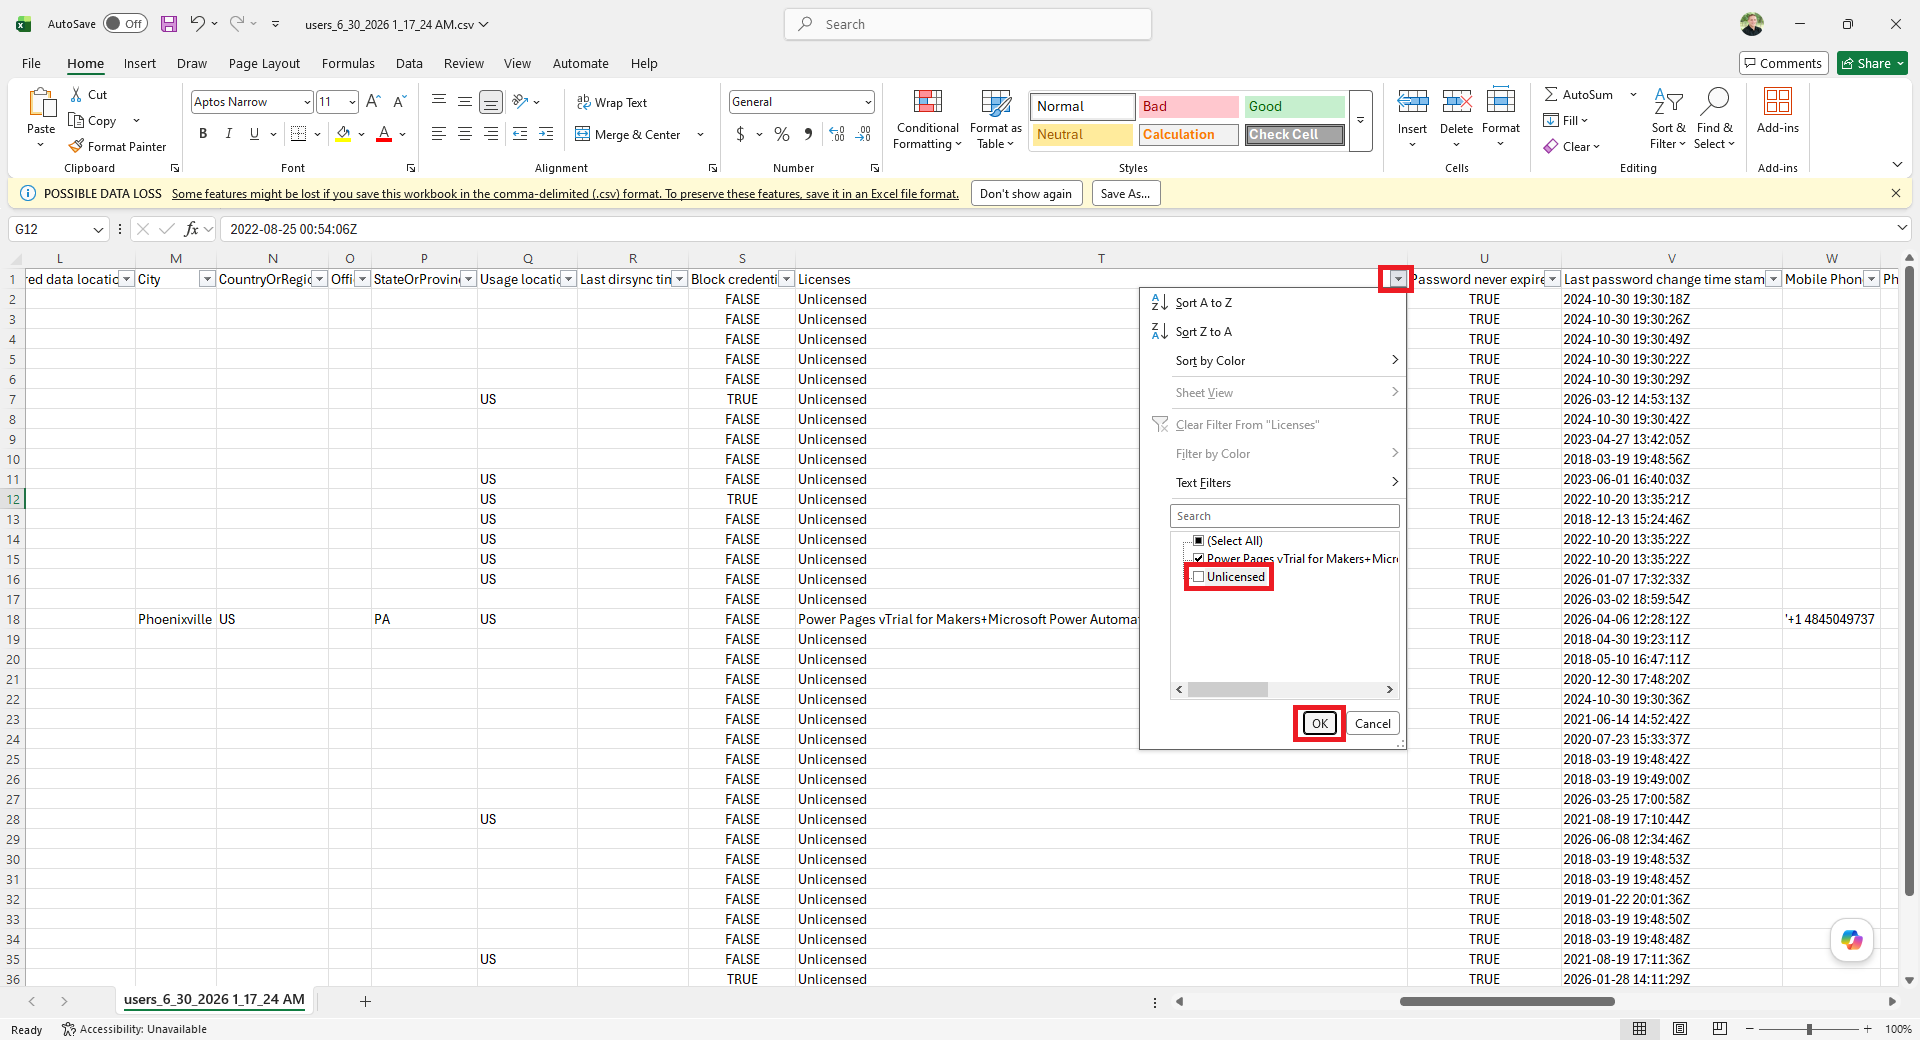
- Click the dropdown in the Block credential column > uncheck FALSE > click OK.
That’s all the users who are disabled who still have a license. You can safely remove the licenses from those accounts after properly backing up the data.
Find Disabled Users Using PowerShell
Install The MG Graph PowerShell Module
To use PowerShell, we’ll need to use the MG Graph module. To use the MG Graph module, we’ll first need to meet the prerequisites, then we’ll need to install it.
NOTE: If PowerShell ever prompts you to run the command, you’ll need to approve by typing y into the PowerShell window.
MG Graph PowerShell Module Prerequisites
- PowerShell 5.1 or later
- .NET Framework 4.7.2 or later
- Latest PowerShellGet module
- Execution policy set to RemoteSigned or less restrictive
How To Check Your PowerShell Version
In PowerShell, run the following command: $PSVersionTable.PSVersion
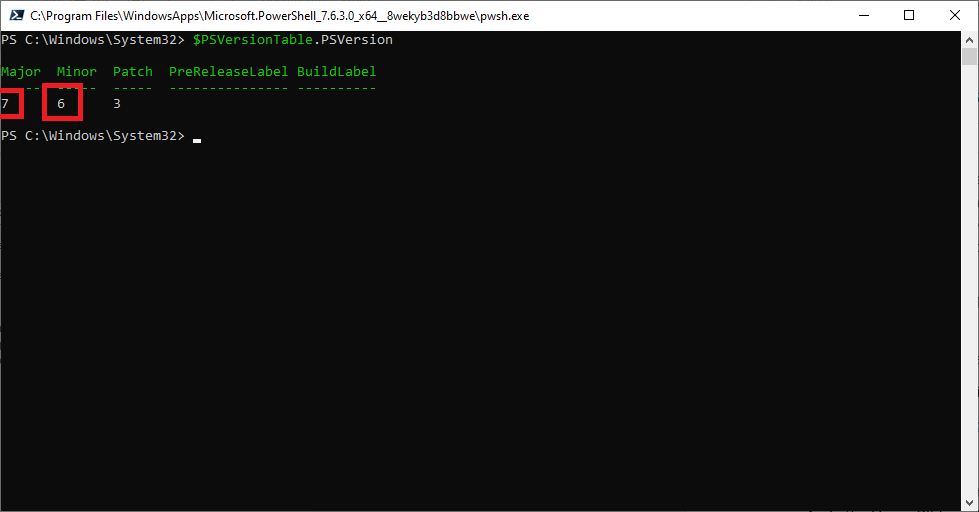
The major version must be greater than 5, and the minor version needs to be greater than 1.
How To Check Your .NET Framework Version Using PowerShell
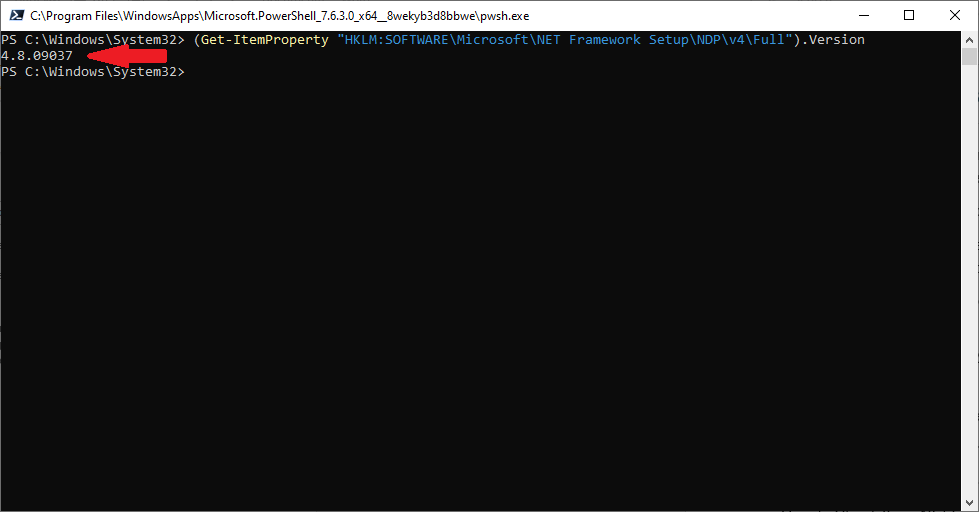
To check your .NET Framework Version using PowerShell, run the following command:
(Get-ItemProperty “HKLM:SOFTWARE\Microsoft\NET Framework Setup\NDP\v4\Full”).Version
If the number returned is greater than 4.7.2, then you’re good to go.
How To Get The Latest PowerShellGet Module
Updating to the latest PowerShellGet module is simple. I prefer to perform it on the CurrentUser only, because I’m not always a local admin on my computer, but you may be able to remove the "-Scope CurrentUser" part of the following command if you’re an admin of your local computer.
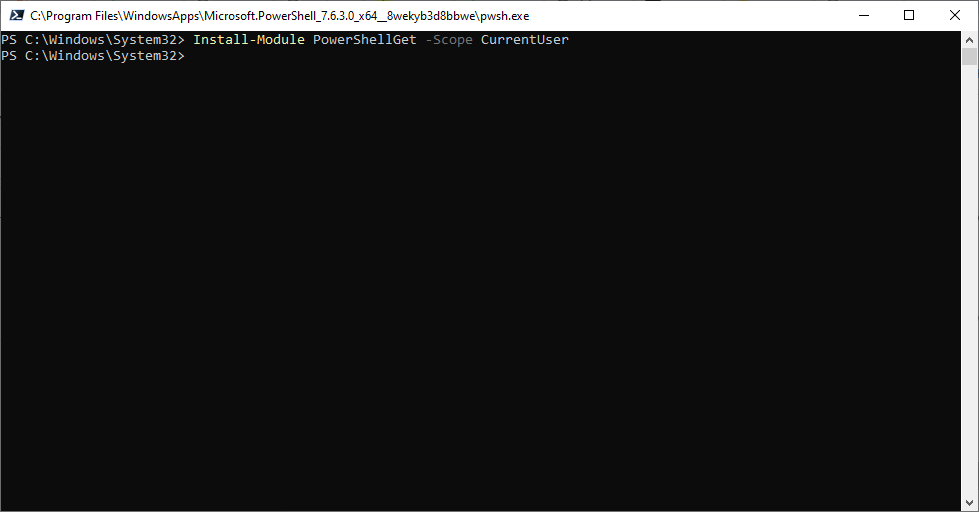
To get the latest PowerShellGet module, run the following command in PowerShell
Install-Module PowerShellGet -Scope CurrentUser
How To Set The Execution Policy To RemoteSigned
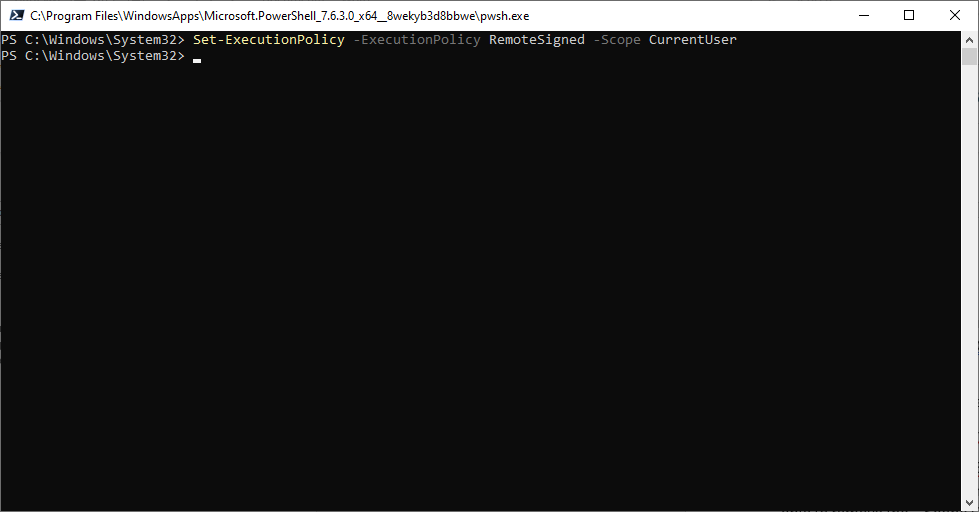
Setting the execution policy to remote signed will allow your PowerShell app to download and install signed PowerShell modules remotely. Run the following command to allow remotely signed PowerShell modules:
Set-ExecutionPolicy -ExecutionPolicy RemoteSigned -Scope CurrentUser
How To Install the Graph MG PowerShell Module
Now that the prerequisites are met, we can install the Graph PowerShell module.
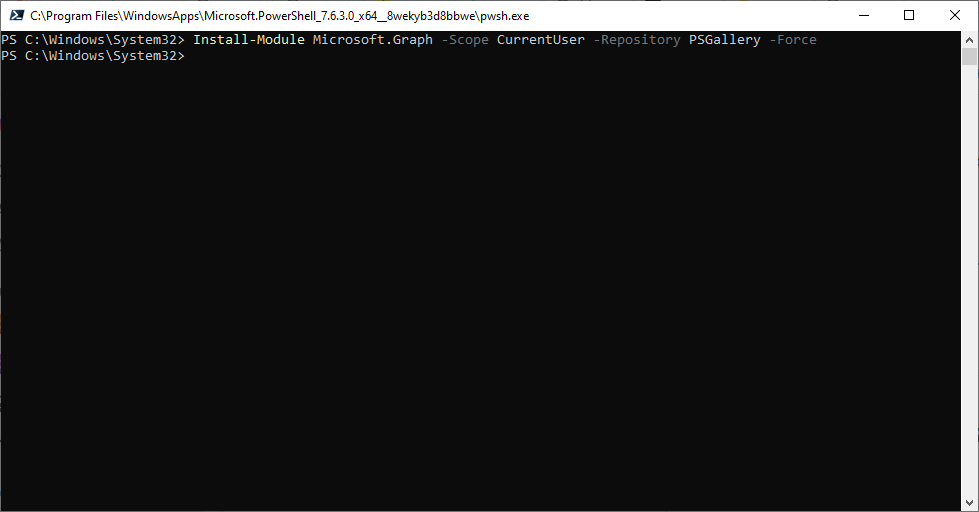
To install the PowerShell module, you’ll need to run the following command. Note, it may take a couple of minutes to complete, so you’ll need to be patient.
Install-Module Microsoft.Graph -Scope CurrentUser -Repository PSGallery -Force
How To Connect To Your Tenant Via PowerShell
Now, we’ll need to connect to your tenant. You can connect to your tenant by running the following command:
Connect-MgGraph -Scopes “User.Read.All”,“Directory.Read.All”
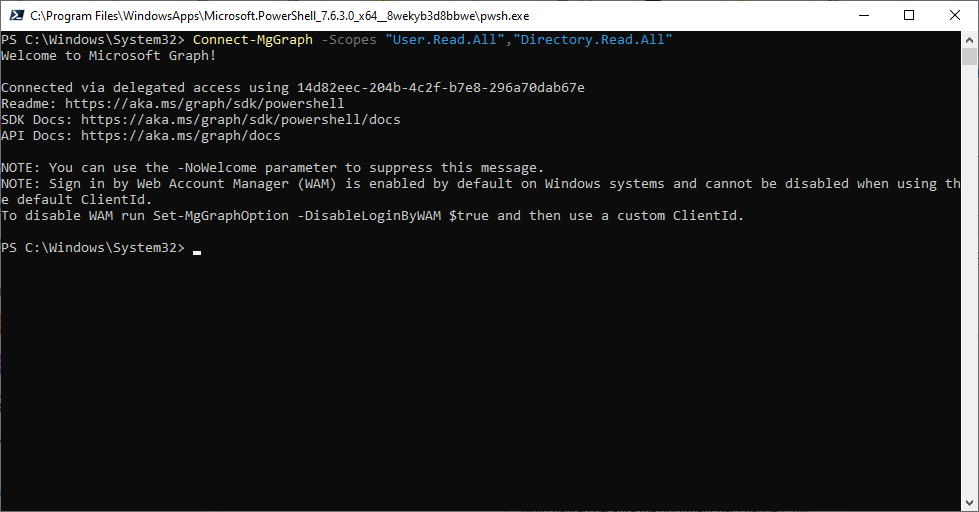
After running the command, you’ll be prompted to log in. Complete the login, including your MFA using an admin account.
Next, you’ll be prompted to approve the permissions requested. Click Accept.
If prompted to “Sign in to all apps and websites on this device?” You can click Yes or No, this app only. It doesn’t matter.
Now that you are signed in, you can run the following commands to display a list of accounts that have licenses that are currently disabled:
$users = Get-MgUser -All -Property Id,DisplayName,UserPrincipalName,AccountEnabled,AssignedLicenses
$results = $users | Where-Object {
$_.AccountEnabled -eq $false -and $_.AssignedLicenses.Count -gt 0
}
$results | Select-Object DisplayName, UserPrincipalName, AccountEnabled
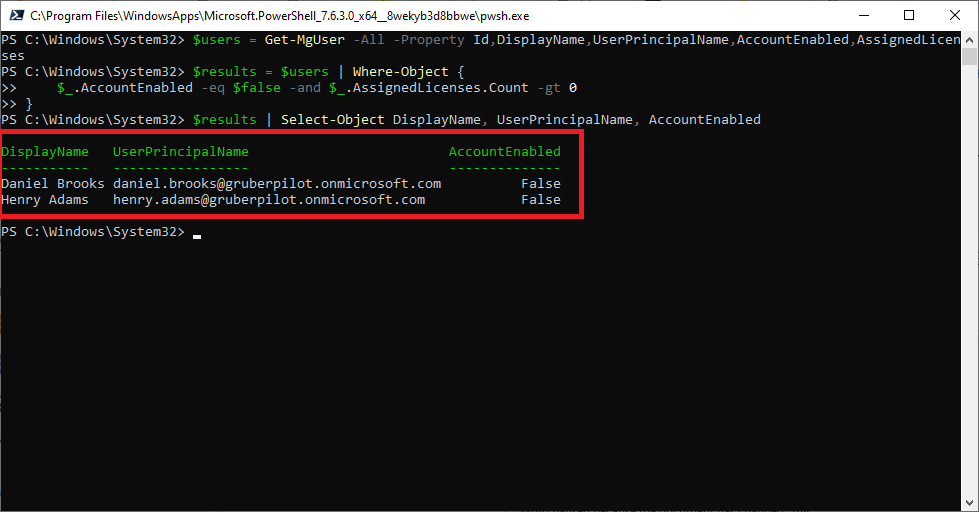
You now have a list of all the accounts that have a license and are currently blocking the signing in to Microsoft 365.
How To View Disabled Accounts In Microsoft 365 Using Third-Party Apps
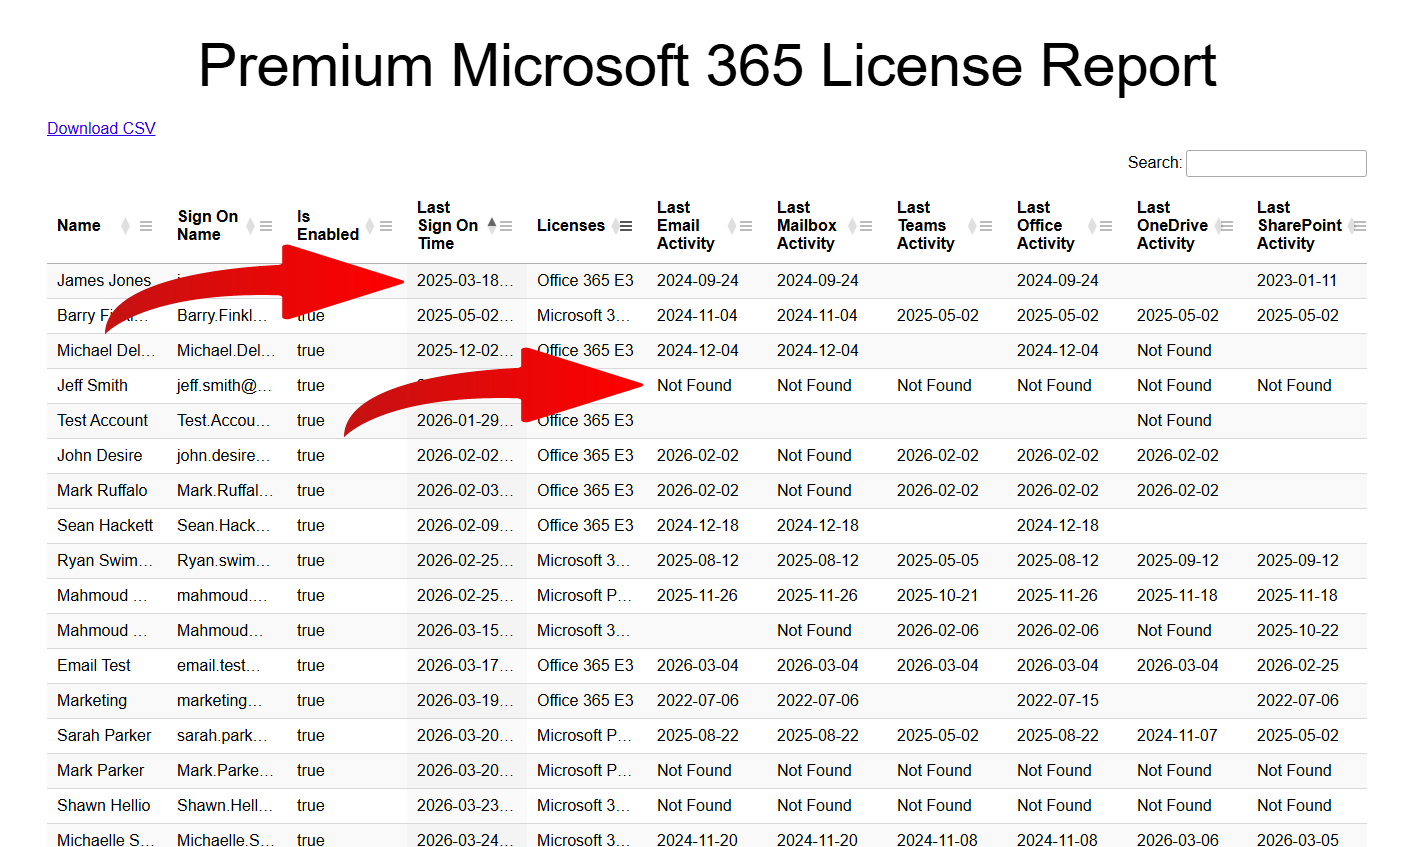
Lastly, you can use a third-party tool provided by Gitbit. The tool is 100% free and 100% secure. The advantage of the tool is that you can use the same report to gather a few different pieces of information.
You can also request to have your information analyzed by a Microsoft partner that can provide you with additional insights into your license usage, more on that later.
- Go to https://www.gitbit.org/microsoft-auth
- Sign in with your Microsoft 365 admin credentials.
- On the Permissions requested page, click Accept.
- In the Unlock Deeper Savings with a Partner-Led Analysis window, you can click No thanks, you don’t need an expert to review the disabled accounts that still have a license. But you may want to enter your email or phone number because the downgrade and the last sign-on information may not be available to you directly.
- Click the filter icon (three lines) in the Licenses column header and select Not empty. This filters the list to display only accounts with assigned licenses.
- Click the 3 lines in the Is Enabled column and type “false” into the search box. This will filter all accounts that are currently disabled.
- This displays all licensed accounts that are currently disabled. It is safe to remove the licenses from these accounts only after you convert the mailbox to a shared mailbox and verify that a retention policy is active.
How To Find And Remove Licenses From Inactive Accounts
This is one of the most common ways a Microsoft 365 customer wastes money. In short, an account will no longer be used, and it will retain the license. Not only is this a financial issue, but it’s a security one as well. Since the account isn’t being used and it’s still enabled, a hacker (or previous employee) may log in and still access and pose as a representative of your business.
Like the previous section, there are 3 ways to find inactive accounts, but there are some issues with the three ways. Depending on your licenses, you may not be able to see the data. In short, if you do not have a Microsoft Entra P1 license in your environment, you’ll need to use the third-party app.
How To Use The Admin Center To Find Inactive Users
To find inactive users that still have a license using the Microsoft Entra Admin Center, you’ll need a Microsoft Entra P1 license in your environment. Legally, you need one assigned to every active user.
- Go to https://entra.microsoft.com/ and sign in with your admin credentials.
- Click Users > Manage view > Edit columns.
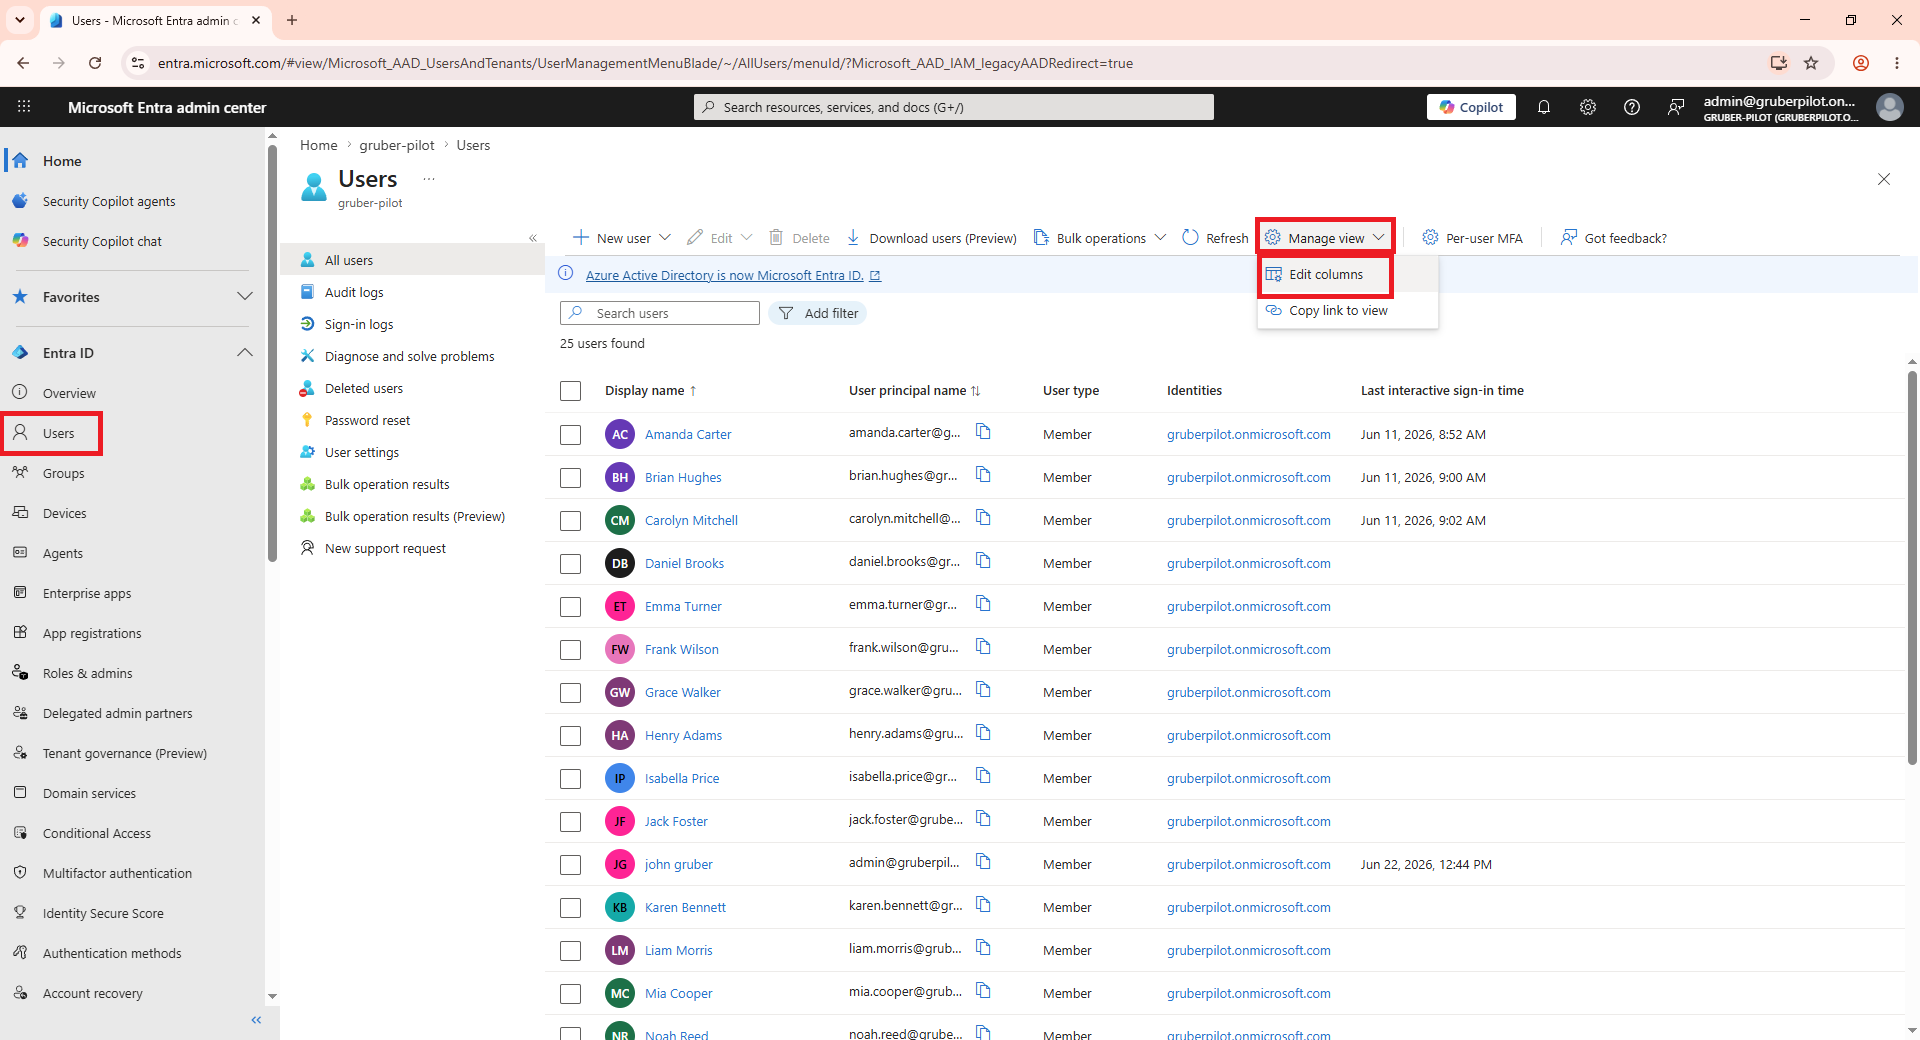
- Remove, replace, or add so the only columns you can see are: Display name, User principal name, User type, Identities, Assign licenses, and Last interactive sign-in time. Click Save.
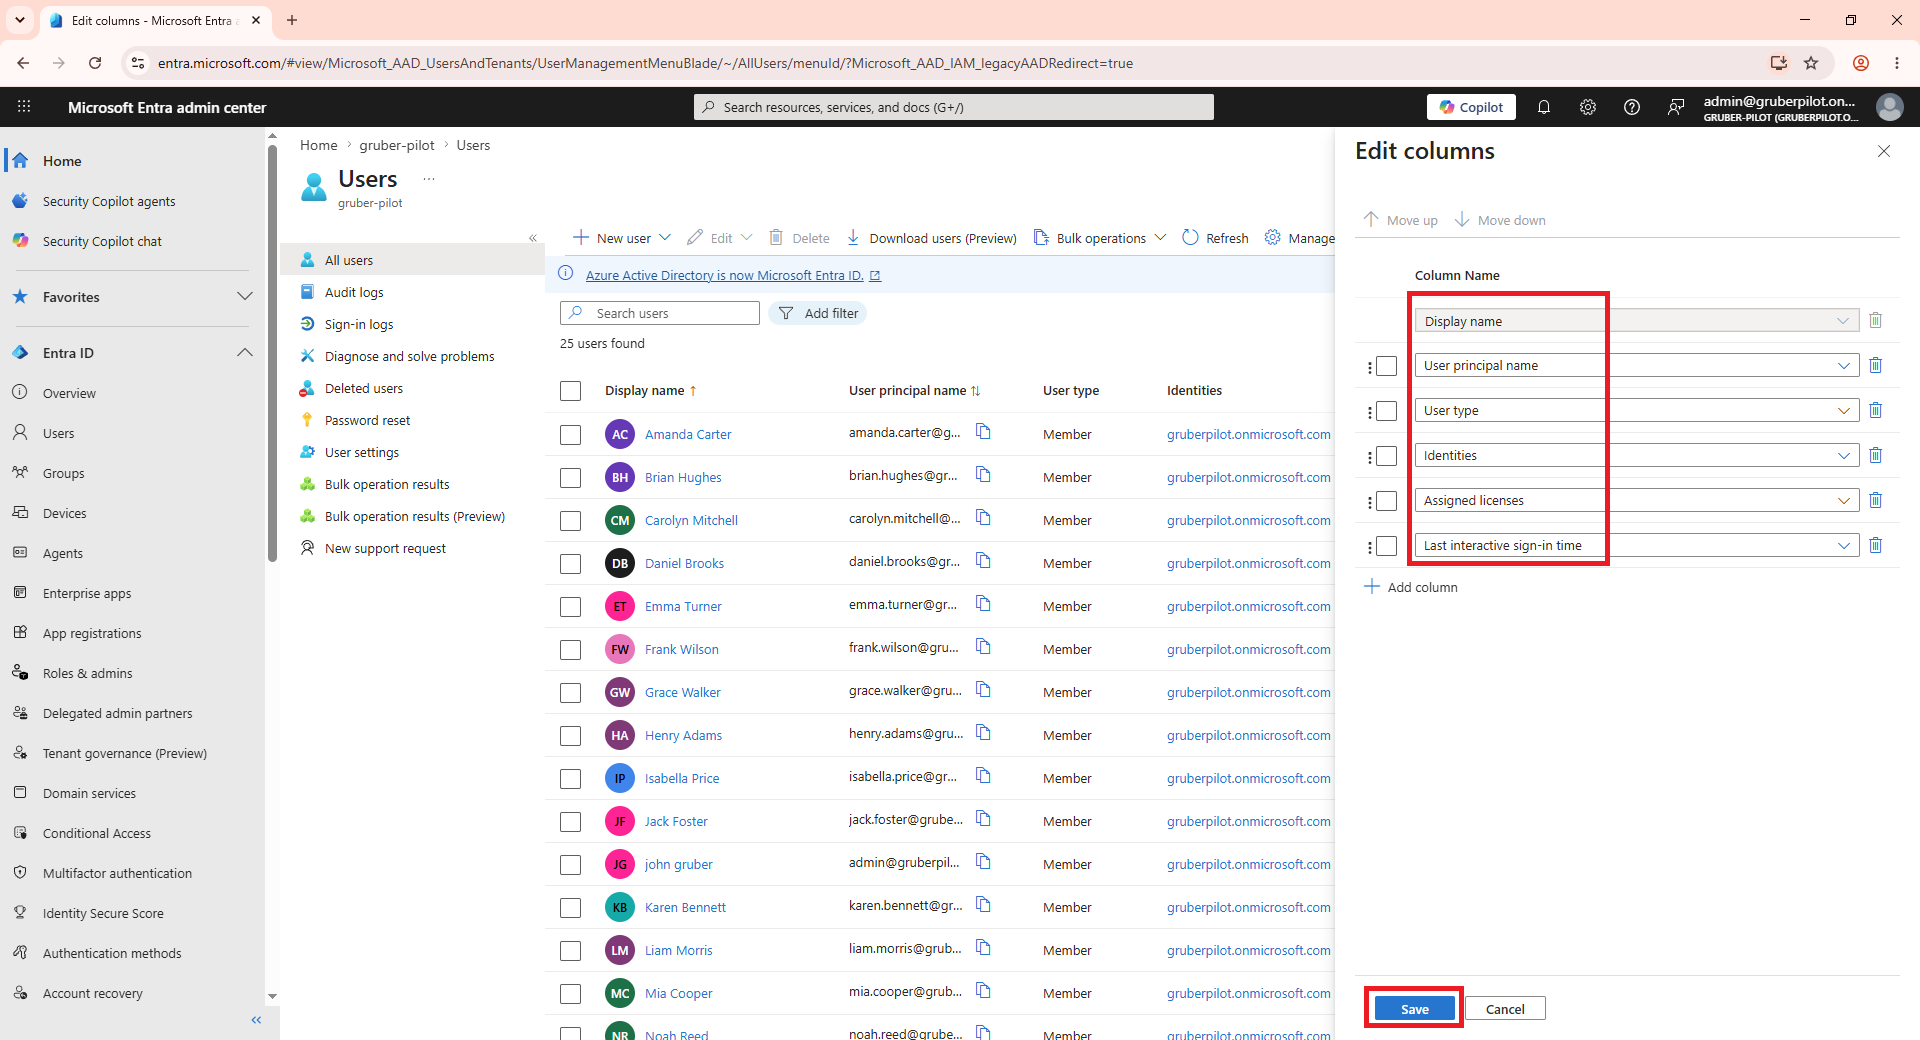
- NOTE: If you cannot find the “Last interactive sign-in time” column, it’s because you don’t have the proper licenses in your environment.
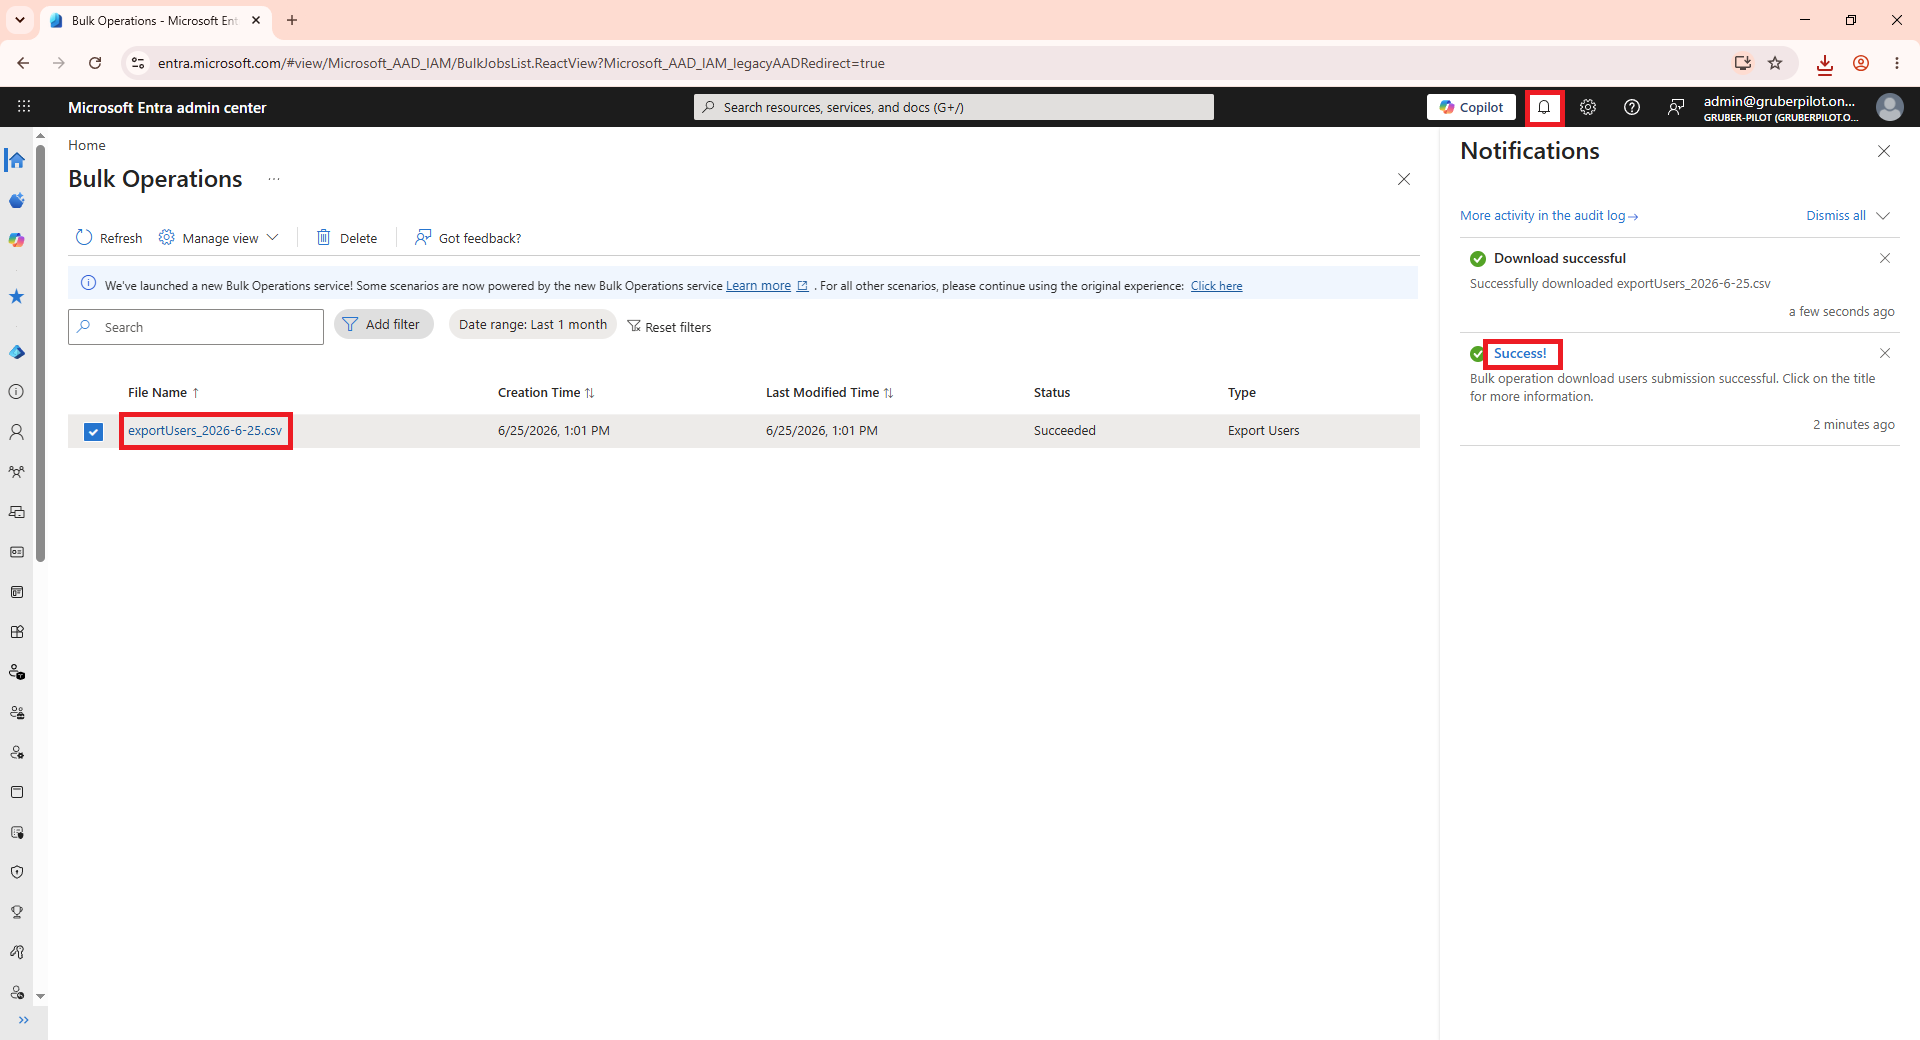
- Click Download users > Start bulk operation.

- Wait for the success pop-up message to appear, then click the notification bell at the top of the page. Under the notifications menu, click Success!, and then select the [report name].
- Open the downloaded spreadsheet.
- Click Sort & Filter > Filter to enable the column filters.
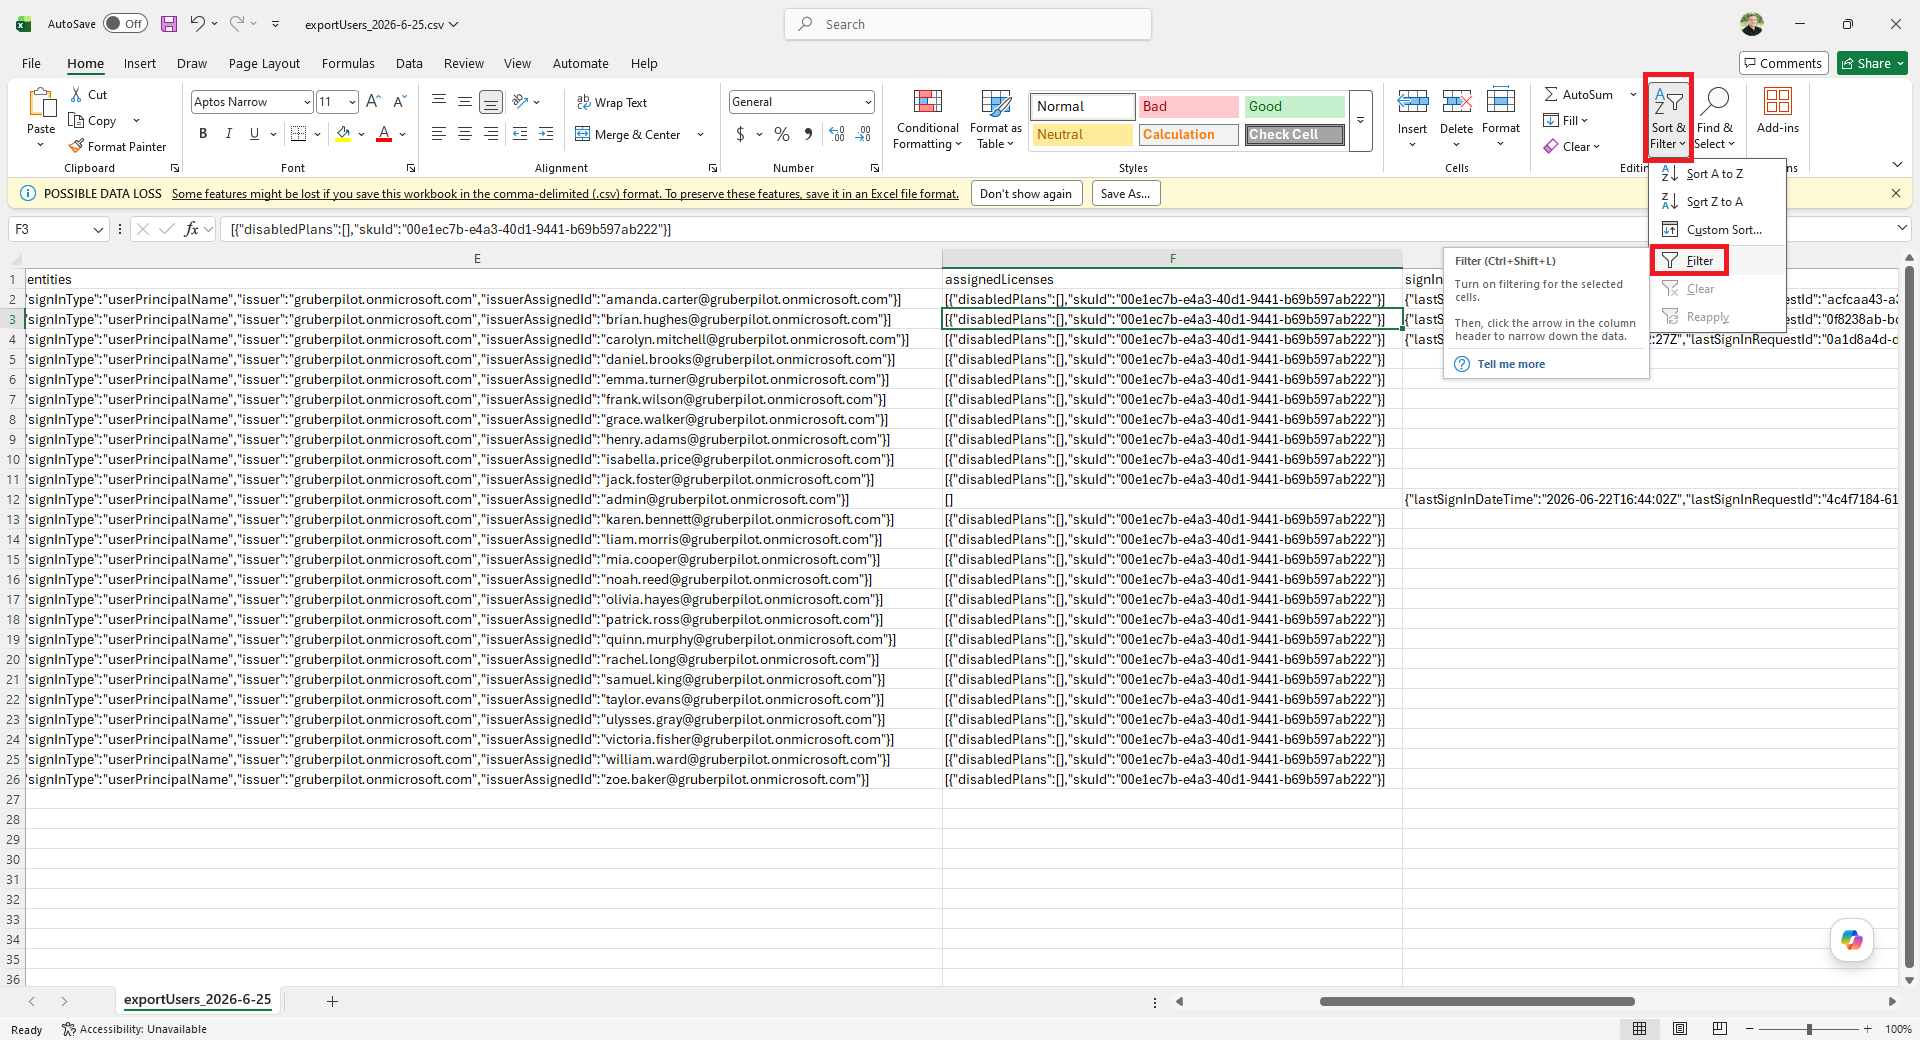
- Click the drop-down in the assignedLicenses column. Uncheck any empty options, i.e., []. Click OK.
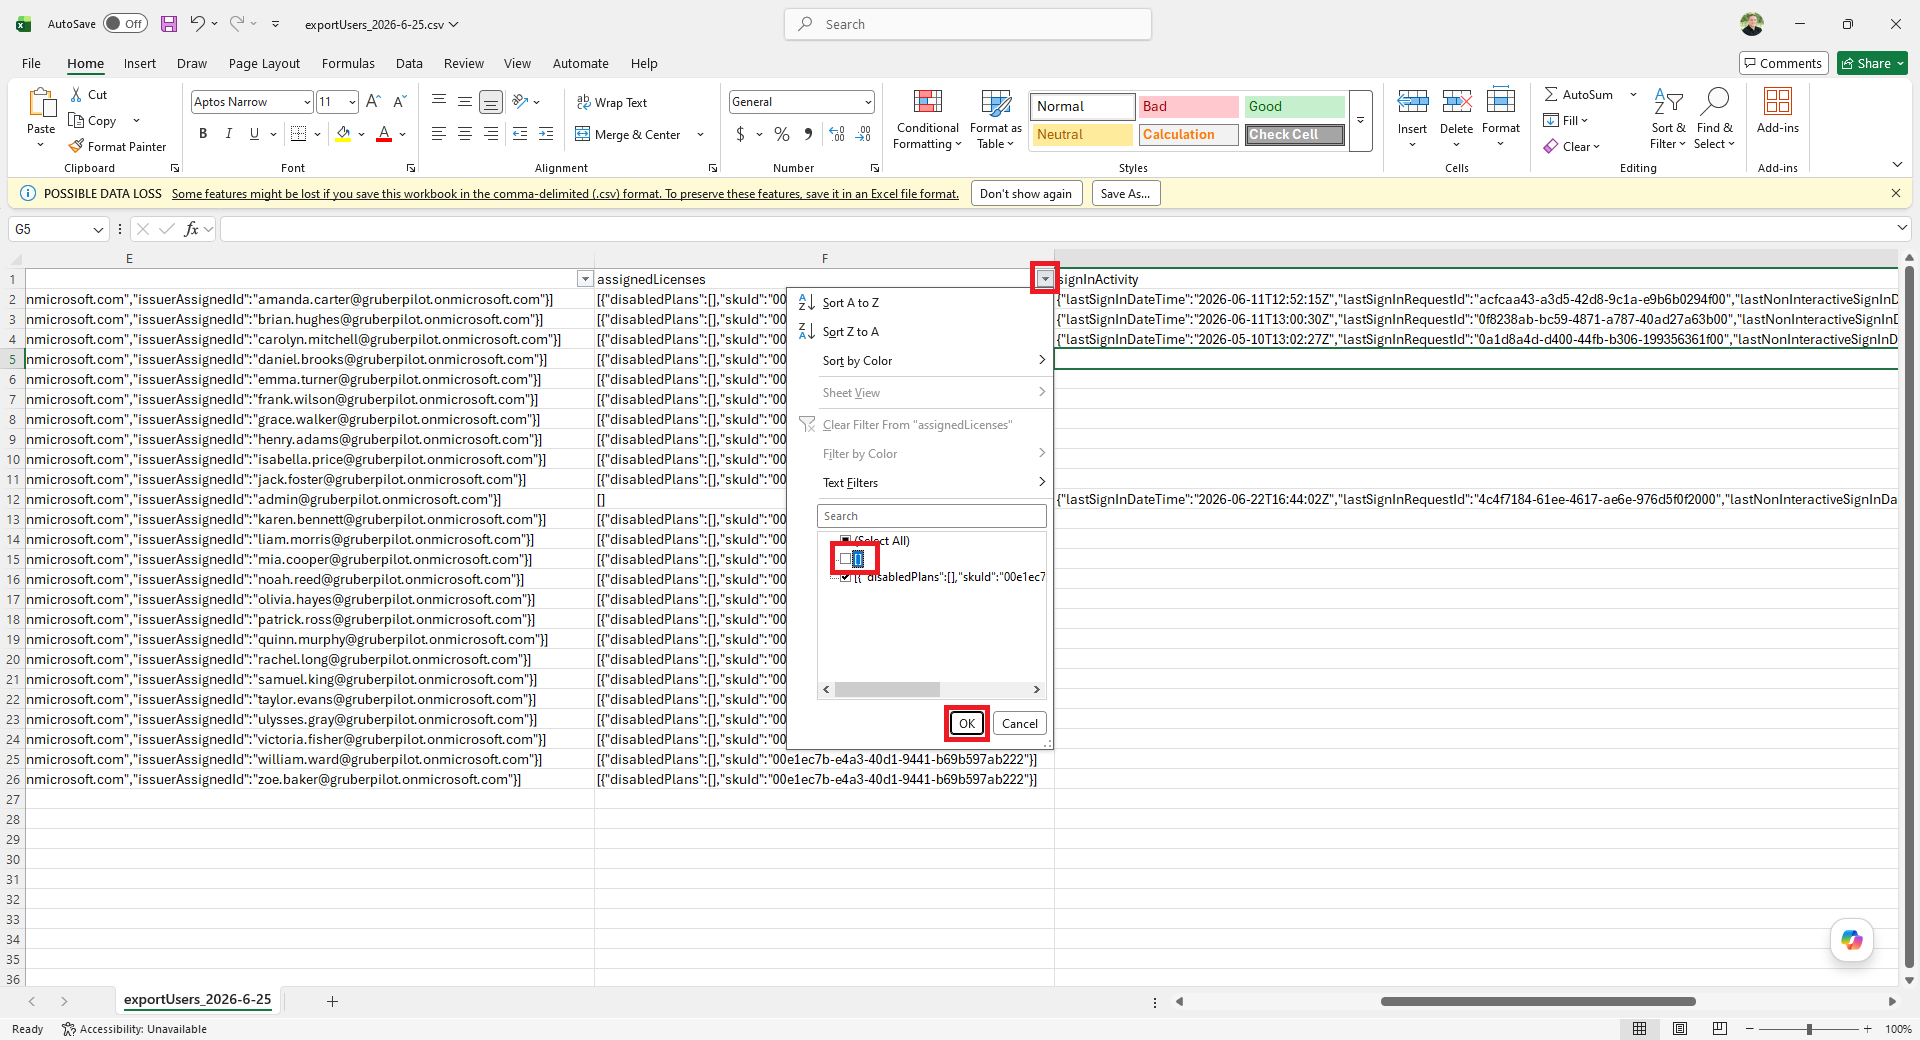
- Click the drop-down in the signInActivity column. Click Sort A to Z.
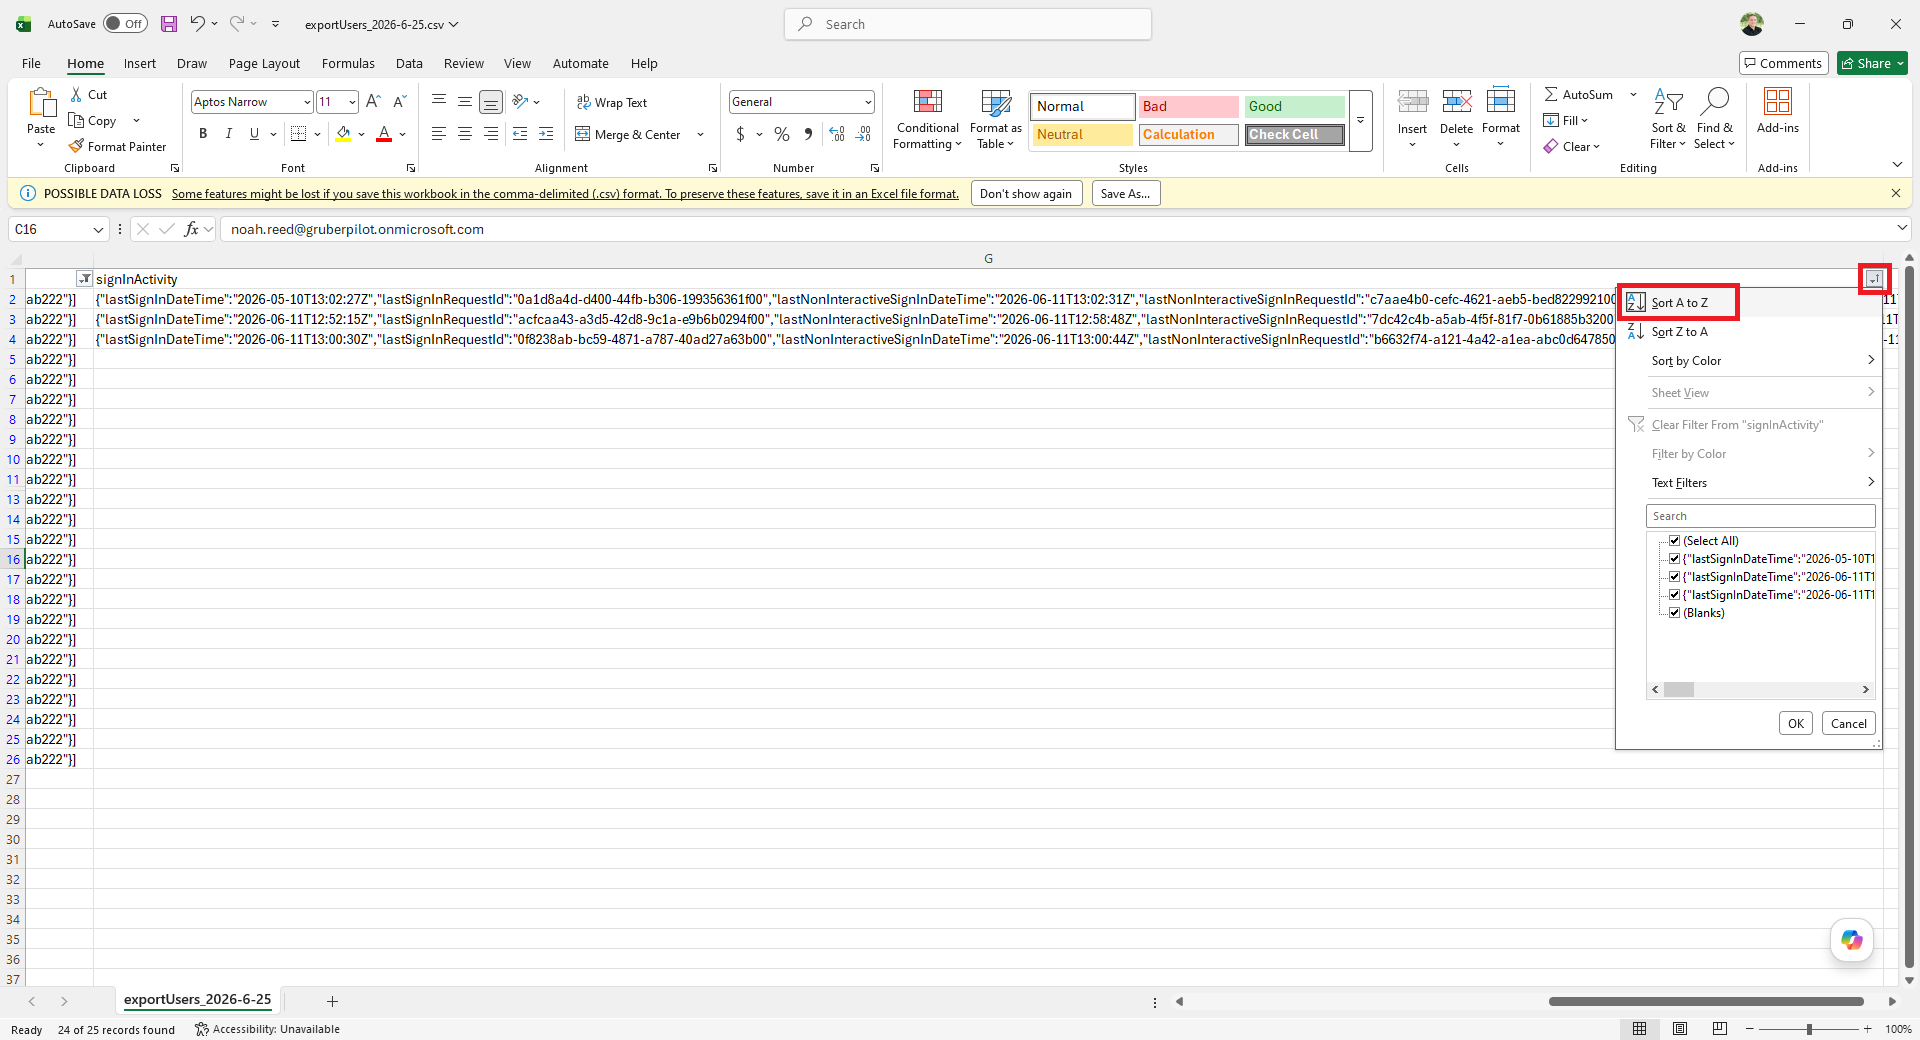
Any users who have an empty signInActivity or a sign-in that was over 30 days ago can be safely disabled, and the license removed after the data is properly secured.
How To Use PowerShell To Find Inactive Users
The same as using the Admin Center, each active user will need a Microsoft Entra P1 in order to export the sign-in activity using PowerShell.
Before we begin, we’ll need to install the MG Graph PowerShell module on your computer. I won’t repeat these steps, but if you didn’t perform them, you’ll need to search and perform the steps listed in the “Install The MG Graph PowerShell Module” section of this article prior to running the following commands.
Now, we’ll need to connect to your tenant. If you are already connected from the previous section, you’ll need to re-run this command because we need access to a different part of the Microsoft 365 tenant.
You can connect to your tenant by running the following command:
Connect-MgGraph -Scopes “User.Read.All”, “AuditLog.Read.All”
After running the command, you’ll be prompted to log in. Complete the login, including your MFA using an admin account.
Next, you’ll be prompted to approve the permissions requested. Click Accept.
If prompted to “Sign in to all apps and websites on this device?” You can click Yes or No, this app only. It doesn’t matter.
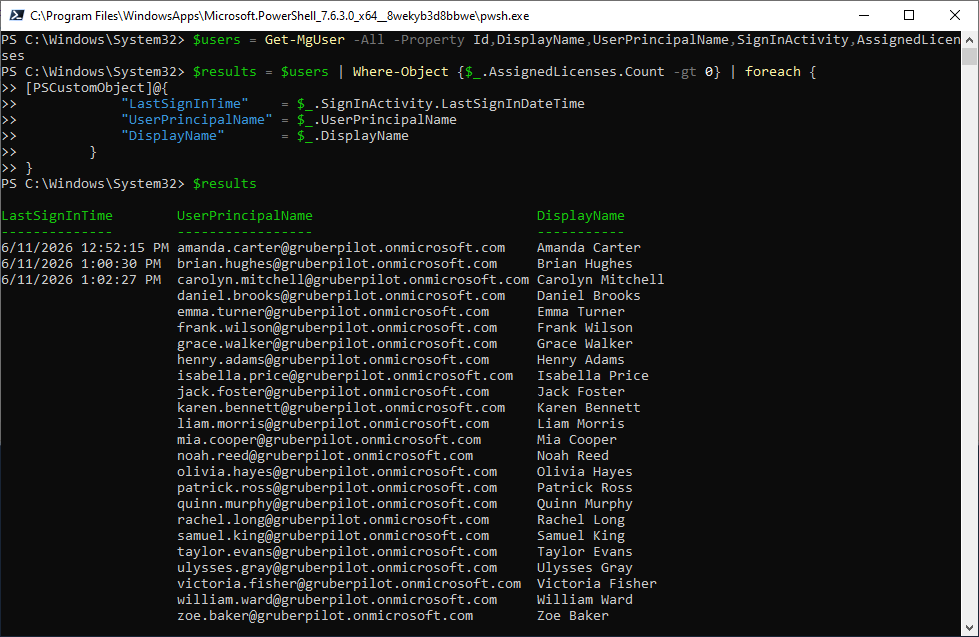
Now that you are signed in, you can run the following commands to display a list of accounts that have licenses and when they last logged into their account:
$users = Get-MgUser -All -Property Id,DisplayName,UserPrincipalName,SignInActivity,AssignedLicenses
$results = $users | Where-Object {$_.AssignedLicenses.Count -gt 0} | foreach {
[PSCustomObject]@{
“DisplayName” = $_.DisplayName
“UserPrincipalName” = $_.UserPrincipalName
“LastSignInTime” = $_.SignInActivity.LastSignInDateTime
}
}
$results
That’s all there is to it. You can export those results to a CSV if you want by running the following command:
$results | Export-Csv -Path “$HOME\Documents\last-sign-in.csv”
This downloads the CSV file containing the user list directly to your local Documents folder.
How To Find And Remove Licenses From Users That Haven’t Logged In For Over 30 Days Without A Microsoft Entra P1 License
This is the best way to get a report of users and their last login date if you don’t have a Microsoft Entra P1 license. Unfortunately, it’s not immediately available. We’ll need to use a third-party app. That app will need time to download the results, which can then be bundled into a CSV and emailed to you.
- Go to https://www.gitbit.org/microsoft-auth
- Sign in with your Microsoft 365 admin credentials.
- On the Permissions requested page, click Accept.
- On the Unlock Deeper Savings with a Partner-Led Analysis window, enter your email address in the Phone or Email text box. Click Yes.
- If you have a Microsoft Entra P1 license, you’ll be able to view the last sign-in date immediately and can continue these steps.
- Click the filter icon (three lines) in the Licenses column header and select Not empty. This filters the list to display only accounts with assigned licenses.
- Ensure the report is sorted by Last Sign On Time by verifying that the up arrow is darker than the down arrow.
That’s it. You can export this report by clicking Download CSV at the top left.
How To Find Over-Licensed Users In Microsoft 365
Finding over-licensed users in Microsoft 365 is very difficult. It’s important to get your licensing correct, but there’s a HUGE margin of error. In summary, Microsoft doesn’t provide any reporting on all the apps and services a user is using. So, a user may only be using Exchange Online, and you may think you can downgrade them to an Exchange Online P1 license, but that user may also have retention policies. They may be using conditional access policies; they may be using any number of additional apps and services that Microsoft does not publicly report on. That’s why it’s the best practice to have two things happen when you have this data.
#1 Hire An Expert
An expert who has gone through this process before is much less likely to miss something important. For example, if you remove a license from a user, you may lose their Microsoft Planner or Microsoft Lists that are being shared with the team. Worse yet, you may lose access to their Microsoft Forms, which may be shared publicly.
If you already have a CSP, you can call them and ask them specifically if they’ve done license audits that include downgrading before. If they haven’t, you may want to reach out to a specialist.
Inform Users Before The Downgrade
Take John Smith, for example. He currently has a Microsoft 365 E3 license but only uses email on his mobile device. On paper, downgrading him to an Exchange Online Plan 1 license sounds like the perfect opportunity to save money. However, John might be relying on a less visible Microsoft 365 app that doesn't trigger standard usage reports—such as Microsoft Planner.
By informing John Smith that we are downgrading his license, but if he needs additional access, let the IT department know, and we can upgrade him again. He may lose access temporarily, but he’ll know how to regain that access.
How To Find Over-Licensed Users In Microsoft 365 Admin Center
If you’d like to continue without expert advice, here’s how to find the last time a user has used a common app using the Microsoft 365 admin center.
What I typically recommend is first starting with email usage. Since virtually everyone uses email, it’s a safe bet to say they’ve used email recently.
- Go to https://admin.cloud.microsoft/ and log in with your admin credentials.
- Click Reports > Usage.
- Click View More located under “Active users - Microsoft 365 Services”
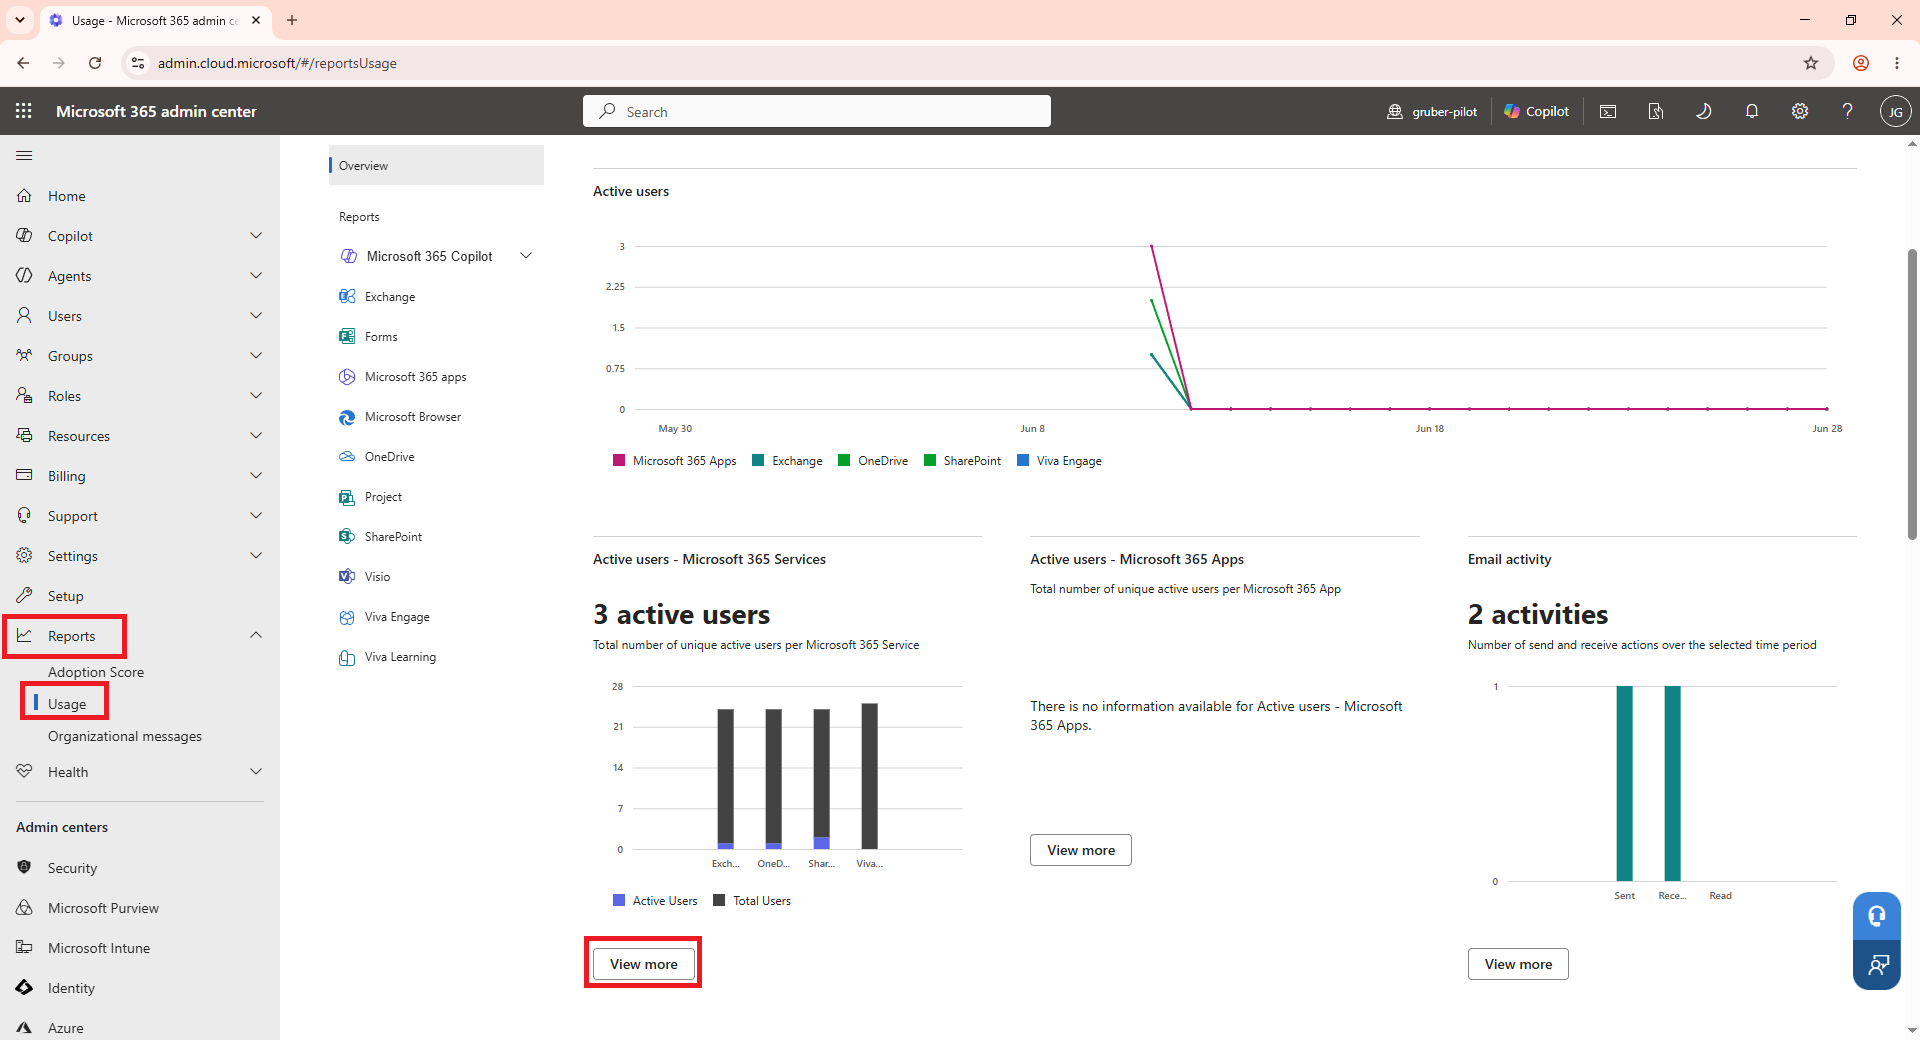
- Review the report located on the website, then click Export.
- Open the CSV in Excel.
- Next, download the Microsoft 365 apps spreadsheet by going back to Reports > Usage and clicking View More located under “Active users - Microsoft 365 Apps”
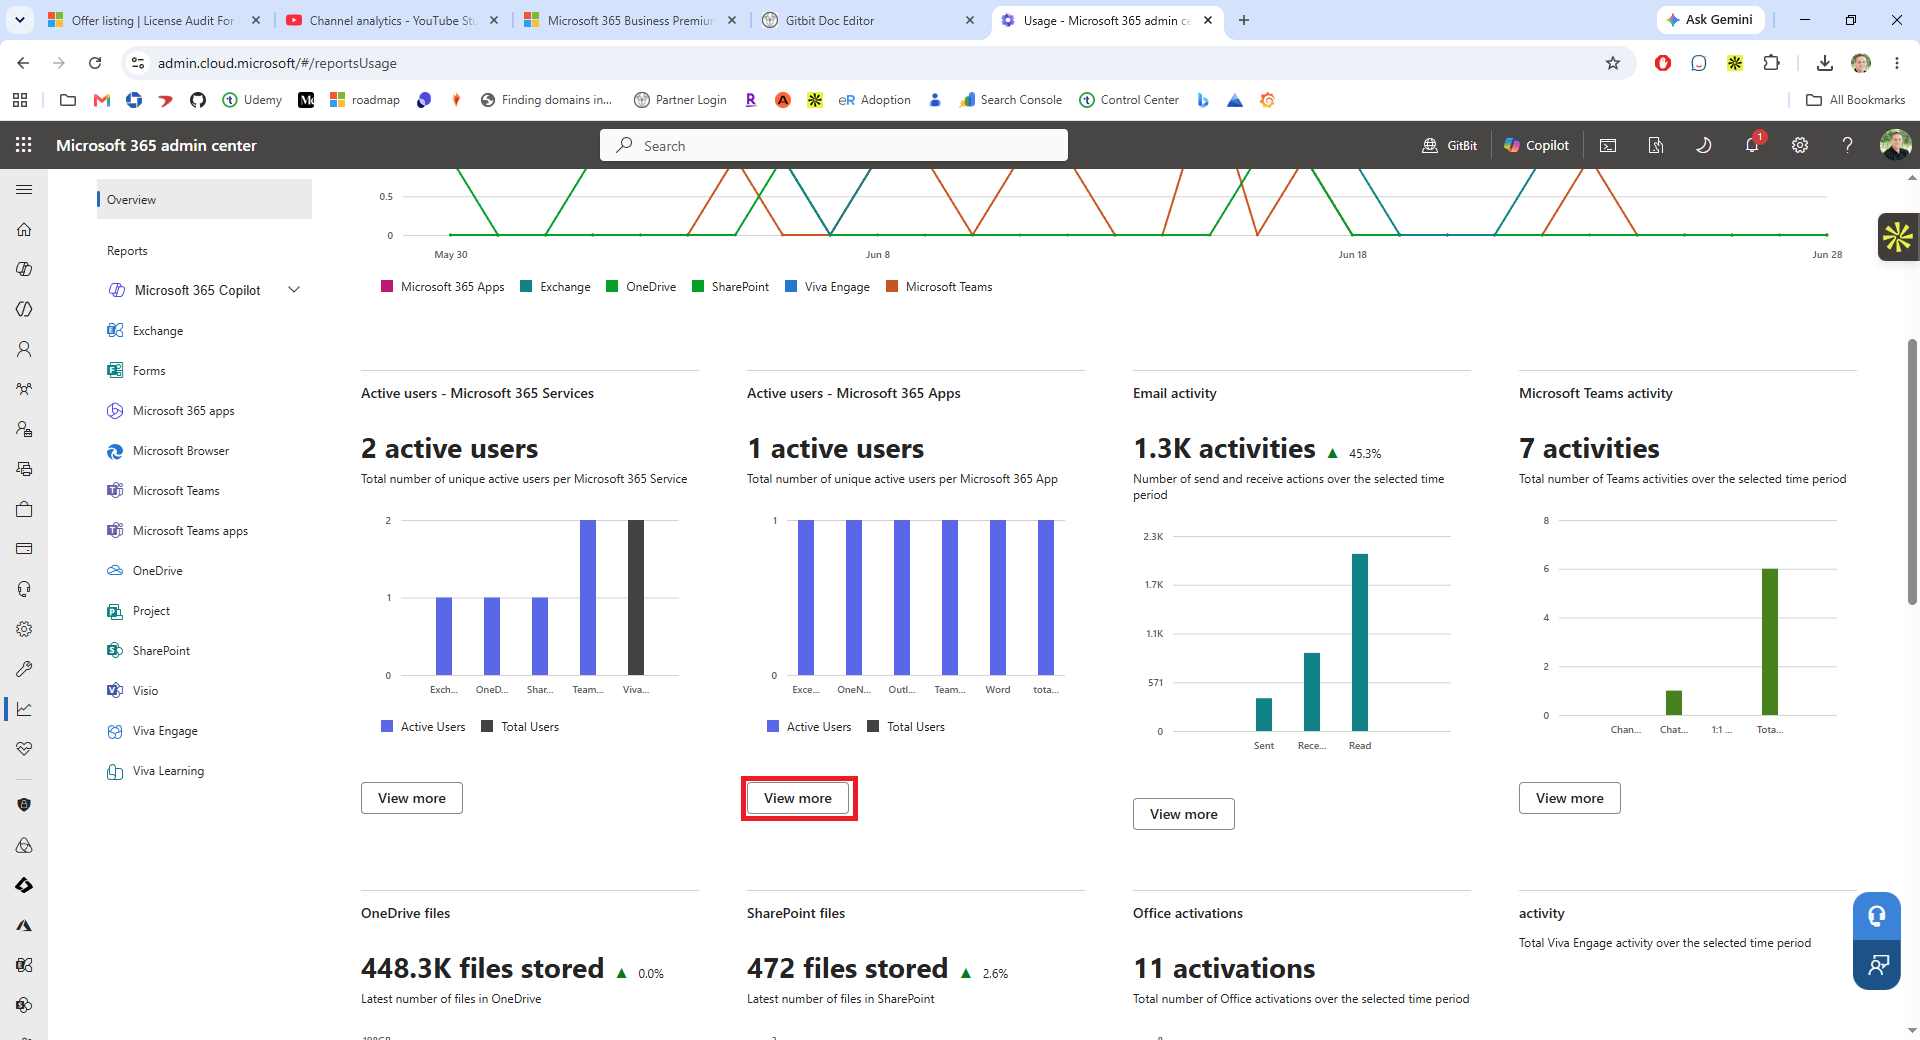
- Review the report and click Export.
- You can start by deleting everyone that you’ve already determined hasn’t logged on or is currently disabled.
- Add the filter by clicking Sort & Filter in the home ribbon > Filter.
- Add a column for Current Licenses.
- Copy the licenses from the How To Use The Admin Center To Find Inactive Users spreadsheet you downloaded earlier into the new column. Be sure to align the user names in both spreadsheets.
- Add a column for Microsoft 365 Apps.
- Copy the Last Activity Date column from the Pro Plus Usage report you downloaded above in step 7 into the Office 365 app usage spreadsheet you’ve been using. Be sure to align the new data with the appropriate users in the Office 365 app usage report.
- For each of the following columns, click the drop-down next to the column name and filter out any logins that have happened in the last month.
- OneDrive Last Activity Date
- SharePoint Last Activity Date
- Skype For Business Last Activity Date
- Yammer Last Activity Date
- Team’s Last Activity Date
- Microsoft 365 Apps
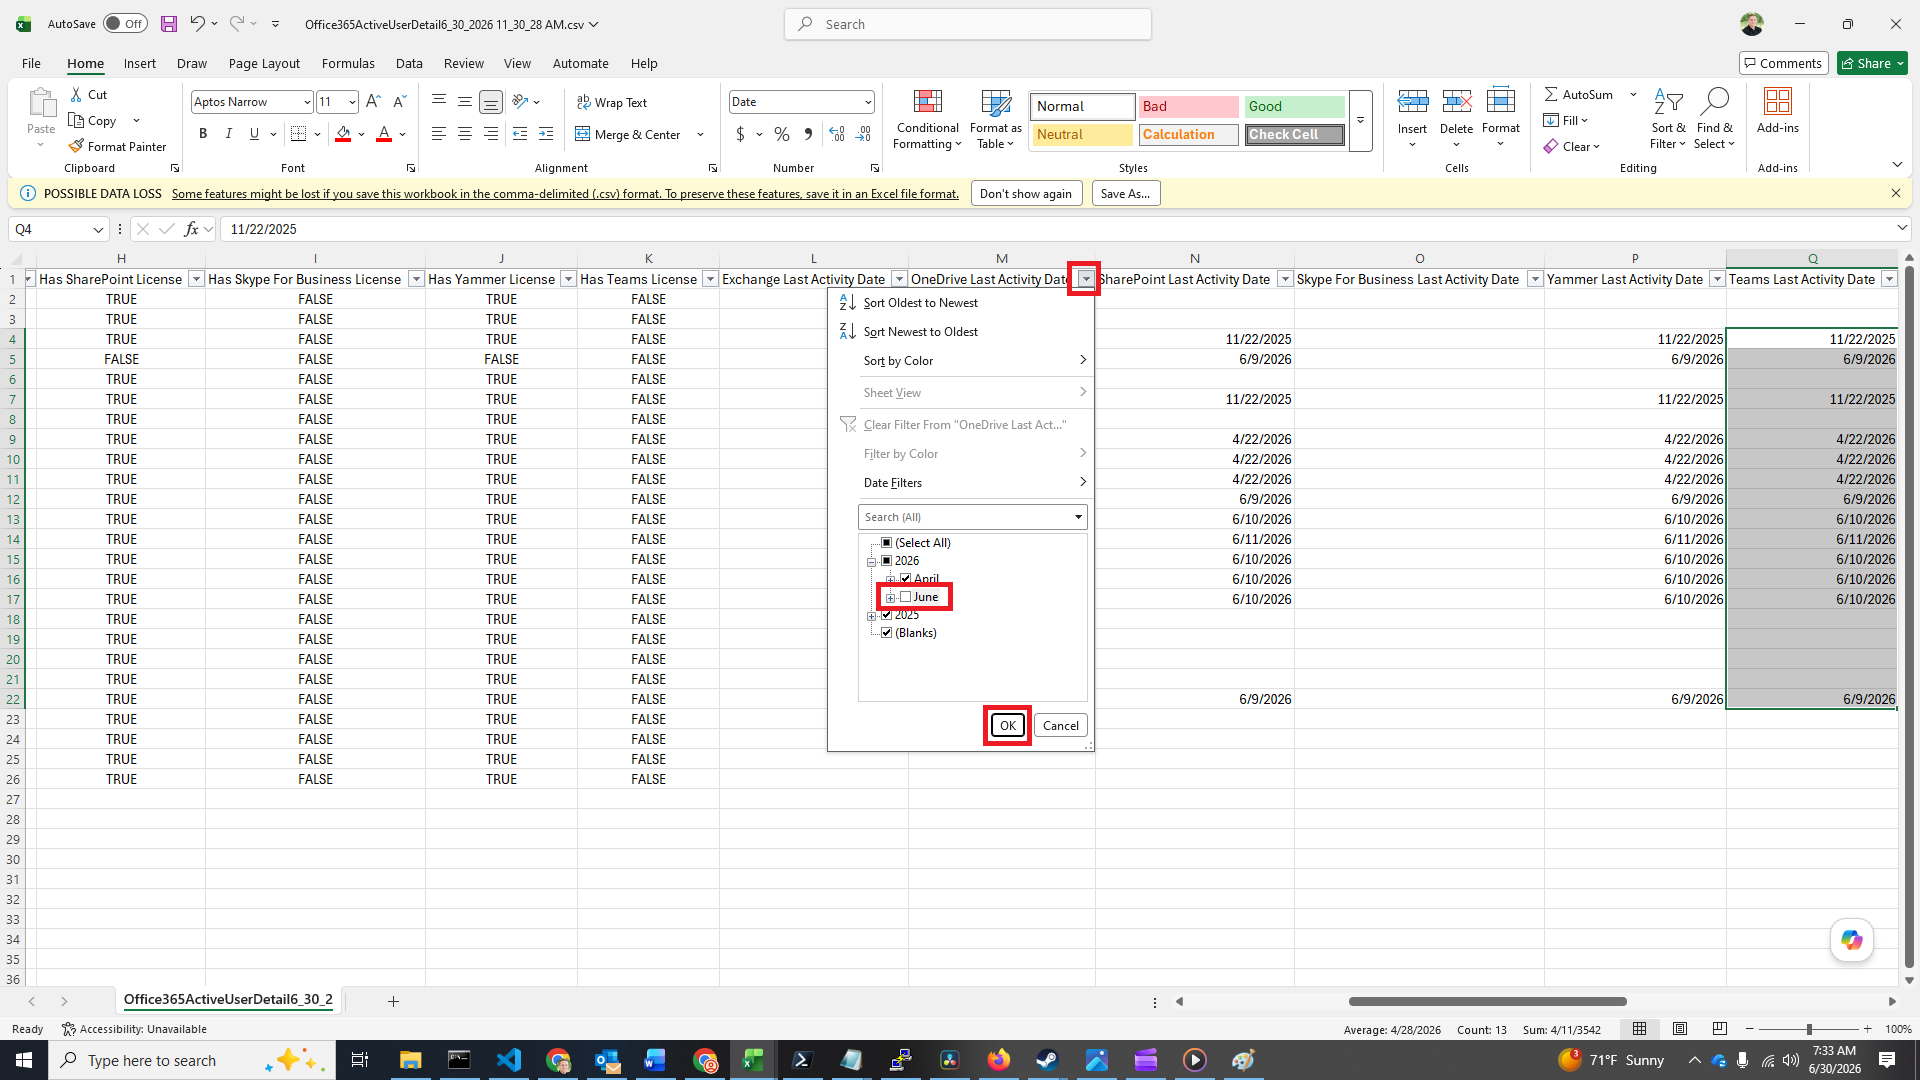
- The users who have not been filtered out are excellent candidates for Exchange Online-only licenses. You may want to double-check their usage of other apps before making any license changes on their accounts.
The following are additional apps and services that those users may be using to double-check before downgrading their license:
- Exchange archive mailbox
- Exchange unlimited archiving
- Advanced Threat Protection
- Conditional Access Policies
- Advanced identity governance
- Automated investigation & response
- Microsoft Intune
- Advanced eDiscovery (eDiscovery Premium)
- Litigation holds capabilities
- Phone System / Calling Plan capabilities
- Compliance recording
- Teams’ webinar
- Windows 11 Business
- Advanced Power BI integration
- Viva Suite features
- Information Protection add‑ons
How To View Over-Licensed Microsoft 365 Accounts Using Third-Party Apps
Microsoft 365 causes a delay in downloading usage data for all the users in your environment. Because of this, you can’t get the usage data immediately. Unfortunately, we’ll need to request the data, then wait for the data to be sent to us.
- Go to https://www.gitbit.org/microsoft-auth
- Sign in with your Microsoft 365 admin credentials.
- On the Permissions requested page, click Accept.
- On the Unlock Deeper Savings with a Partner-Led Analysis window, enter your email address in the Phone or Email text box. Click Yes.
That’s it. Now, you’ll need to wait for someone to contact you with the spreadsheet. Most of the time, an expert will request a call with you to review the results. If you’d prefer, you can politely ask for the data to be emailed to you, and they can send you the report.
I strongly recommend getting the expert to review the results with you. As you can see above, a Microsoft 365 account is tied into a LOT of apps, tools, and services. Downgrading a license can cause a user to stop functioning, which can be a bit embarrassing for you and cause loss of productivity for your organization.
Stop Paying For Unassigned Licenses
Many administrators don't realize that an organization continues to pay for a Microsoft 365 license regardless of whether it is assigned to a user. To actually stop the billing and save money, you must unassign the license and remove it from your overall subscription.
There are three different ways to see the licenses available in your organization that aren’t currently assigned. The easiest way is to use the Microsoft 365 admin center.
How To Find Unassigned Microsoft 365 Licenses Using The Microsoft 365 Admin Center
- Go to https://admin.cloud.microsoft/#/homepage
- Click Show All > Billing > Licenses.
- On that webpage, you’ll see a list of all your licenses in your organization, along with a column labeled “Available Licenses”.
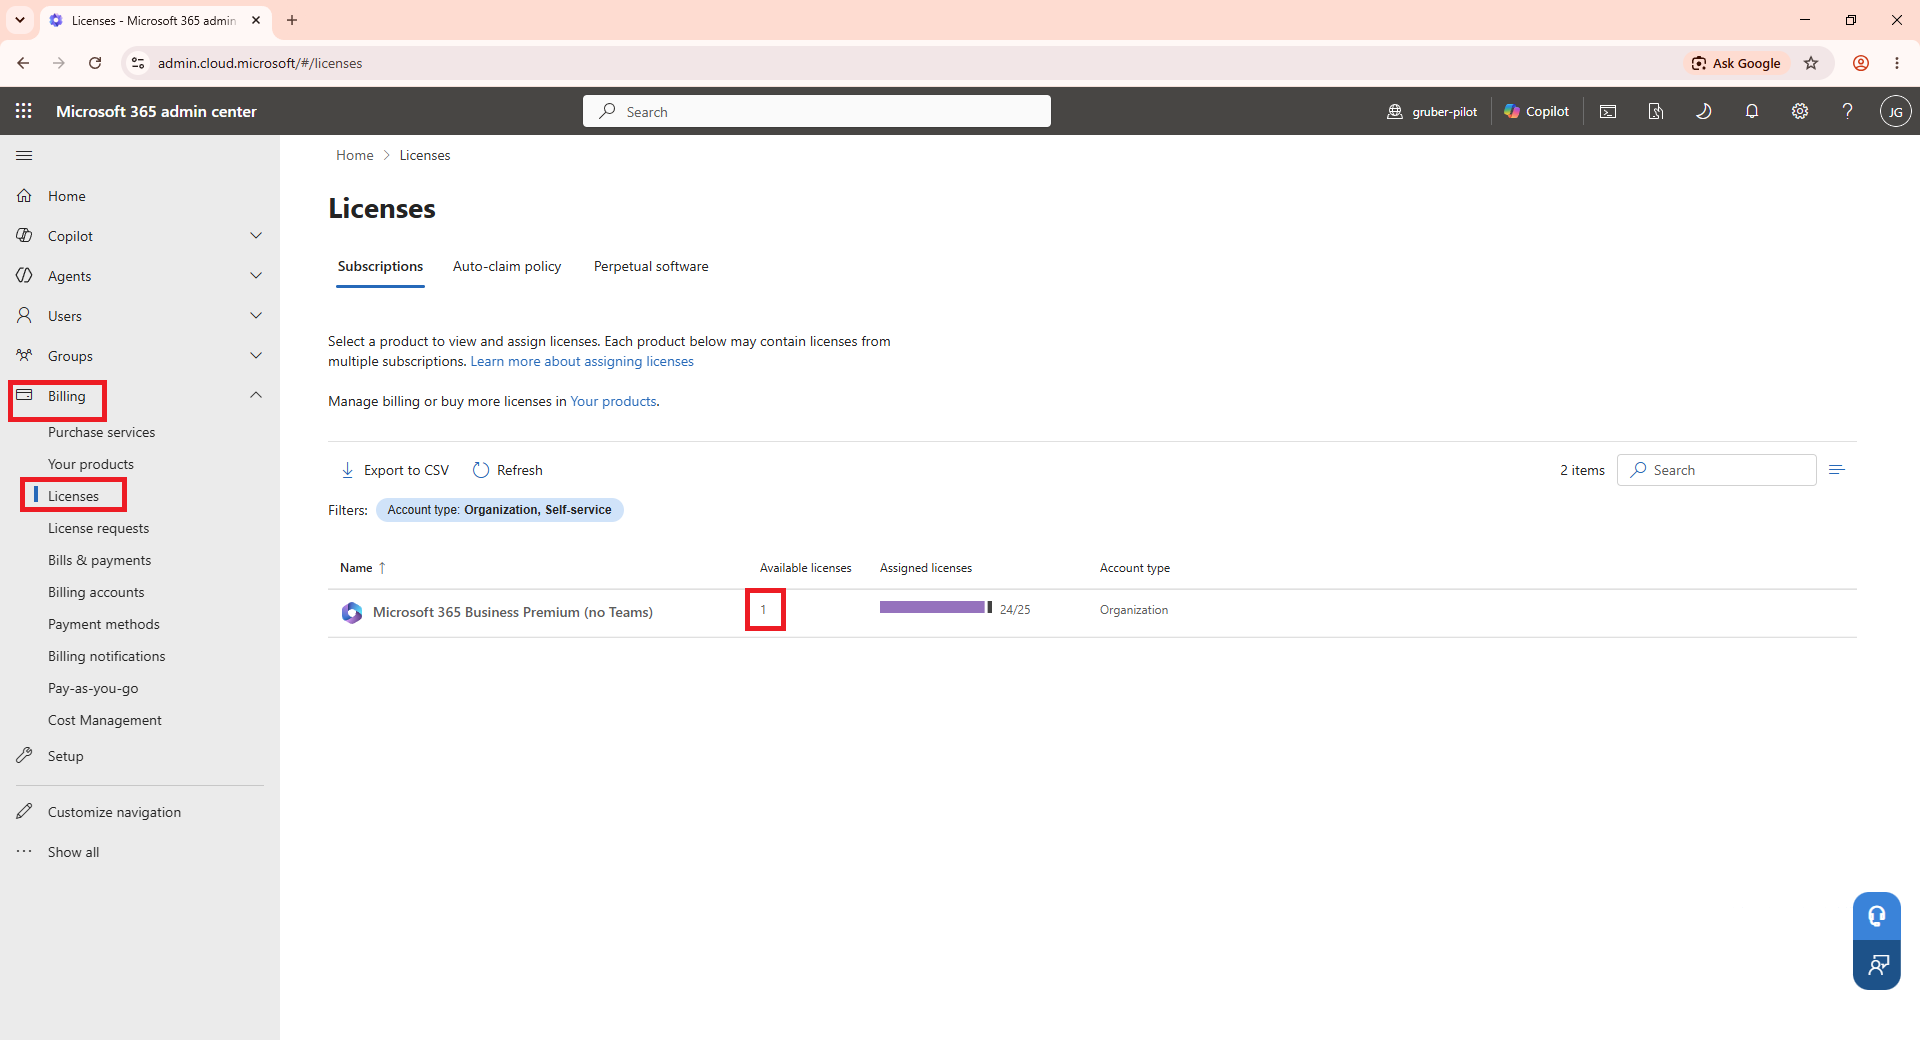
Any number above 0 in the Available Licenses column is typically safe to remove from your organization with two caveats. Some licenses aren’t assigned to users through the Microsoft 365 admin center.
The Available License Count May Be Wrong
For example, licenses on the third-party app Gitbit aren’t assigned to users in the Microsoft 365 admin center. Consequently, the Microsoft 365 admin center reflects those licenses as Available, unaware that they are actively assigned to users within the third-party application.
Some Licenses Aren't Per User
Some licenses are consumed as they are used. For example, additional storage licenses for SharePoint Online may show as available, but removing them will decrease the amount of free space available in SharePoint Online and possibly cause a disruption to SharePoint Online usage.
How To Find Unassigned Microsoft 365 Licenses Using PowerShell
You can also pull the same information from PowerShell. While I typically recommend using the admin center since it’s so quick and easy for finding available licenses, you may be trying to automate as much of this process as possible, in which case using PowerShell may make more sense.
Open PowerShell and, if needed, run the following commands:
Install-Module Microsoft.Graph -Scope CurrentUser
Connect-MgGraph -Scopes "Organization.Read.All"
Log in with your Microsoft 365 admin account.
Accept the permissions when requested.
Run the following command to download the information and cache it locally.
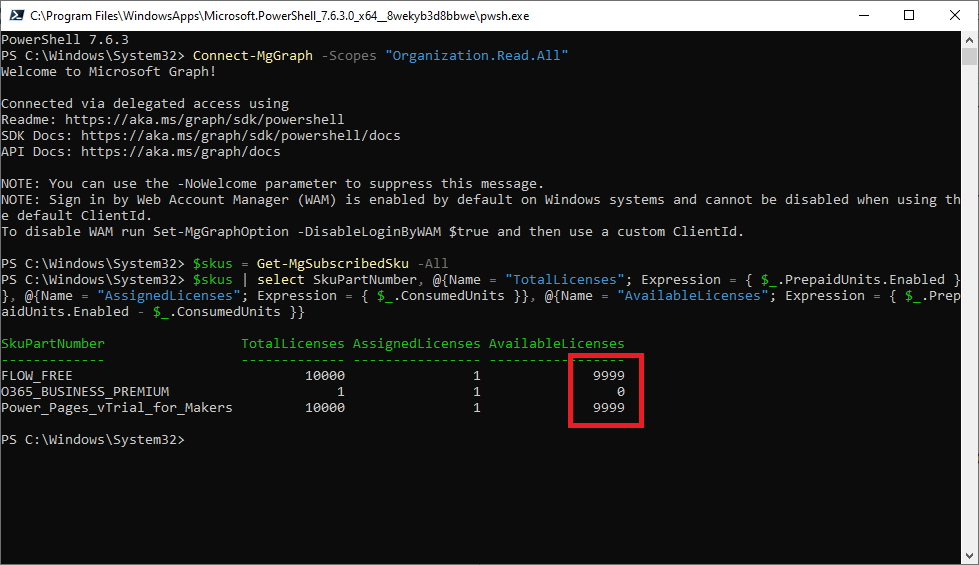
$skus = Get-MgSubscribedSku -All
Run the following command to view all the licenses:
$skus | select SkuPartNumber, @{Name = "TotalLicenses"; Expression = { $_.PrepaidUnits.Enabled }}, @{Name = "AssignedLicenses"; Expression = { $_.ConsumedUnits }}, @{Name = "AvailableLicenses"; Expression = { $_.PrepaidUnits.Enabled - $_.ConsumedUnits }}
How To Find Unassigned Microsoft 365 Licenses Using Third-Party Tools
Gitbit, as well as other license management tools, will probably show you the same data, but it really isn’t necessary. Regardless, here’s how to pull the same data using a third-party tool:
- Go to https://www.gitbit.org/microsoft-auth
- Sign in with your Microsoft 365 admin credentials.
- On the Permissions requested page, click Accept.
- On the Unlock Deeper Savings with a Partner-Led Analysis window, enter your email address in the Phone or Email text box. Click Yes.
As of now, this data is only available to experts because it is still being reviewed by Gitbit’s internal team. Once the data can be verified and beautified, it will be made public.
Redefine The License Terms In Microsoft 365
Microsoft recently adjusted its pricing model, charging different rates for the same license based on commitment terms, billing frequency, or sector-specific eligibility.
- The subscription length
- Billing Frequency
In short, the same license has three different price points. This was implemented when Microsoft deployed the New Commerce Experience (NCE) framework.
Let’s take an example to explain.
The Microsoft 365 Business Premium license currently costs $26.40 a month per license. If you are sure you’ll need that license for an entire year, you can switch from the monthly subscription to a yearly subscription and save $3.30 a month, and pay $23.10/month.
If you have the cash lying around, you can instead pay the entire year upfront and pay $264.00, which equates to $22/month.
To capitalize on this somewhat crazy billing structure, it’s recommended to mix and match:
For example, if you have 100 employees who all use the Microsoft 365 Business Premium license, 80% of those employees are probably going to stick around for an entire year or be quickly replaced if they are terminated.
Therefore, switching 80% of your Microsoft 365 Business Premium licenses to a yearly subscription. If your IT budget has the available funds yearly, then it may make more sense to pay for those 80% of the licenses yearly and save even more. To do a little math:
Everyone on a monthly subscription: 100 X $26.4 = $2640.00
80% on yearly subscription: (80 X $23.10) + (20 X $26.40) = $2376.00
You just saved 9% of your Microsoft 365 Business Premium license costs.
Redefine The License Terms In Microsoft 365 Admin Center
Unfortunately, you can’t get the license terms in PowerShell or use a third-party application (except for the CSP partner center). But we can get the license terms from the Microsoft 365 admin center.
- Go to the Microsoft 365 admin center (https://admin.cloud.microsoft/?source=applauncher#/homepage)
- Click Billing > Licenses > Select the license you want to review.
- Click ellipsis (…) next to the subscription > Manage subscription settings.
- You can view the billing settings right on this page.